Chocolate chip scones

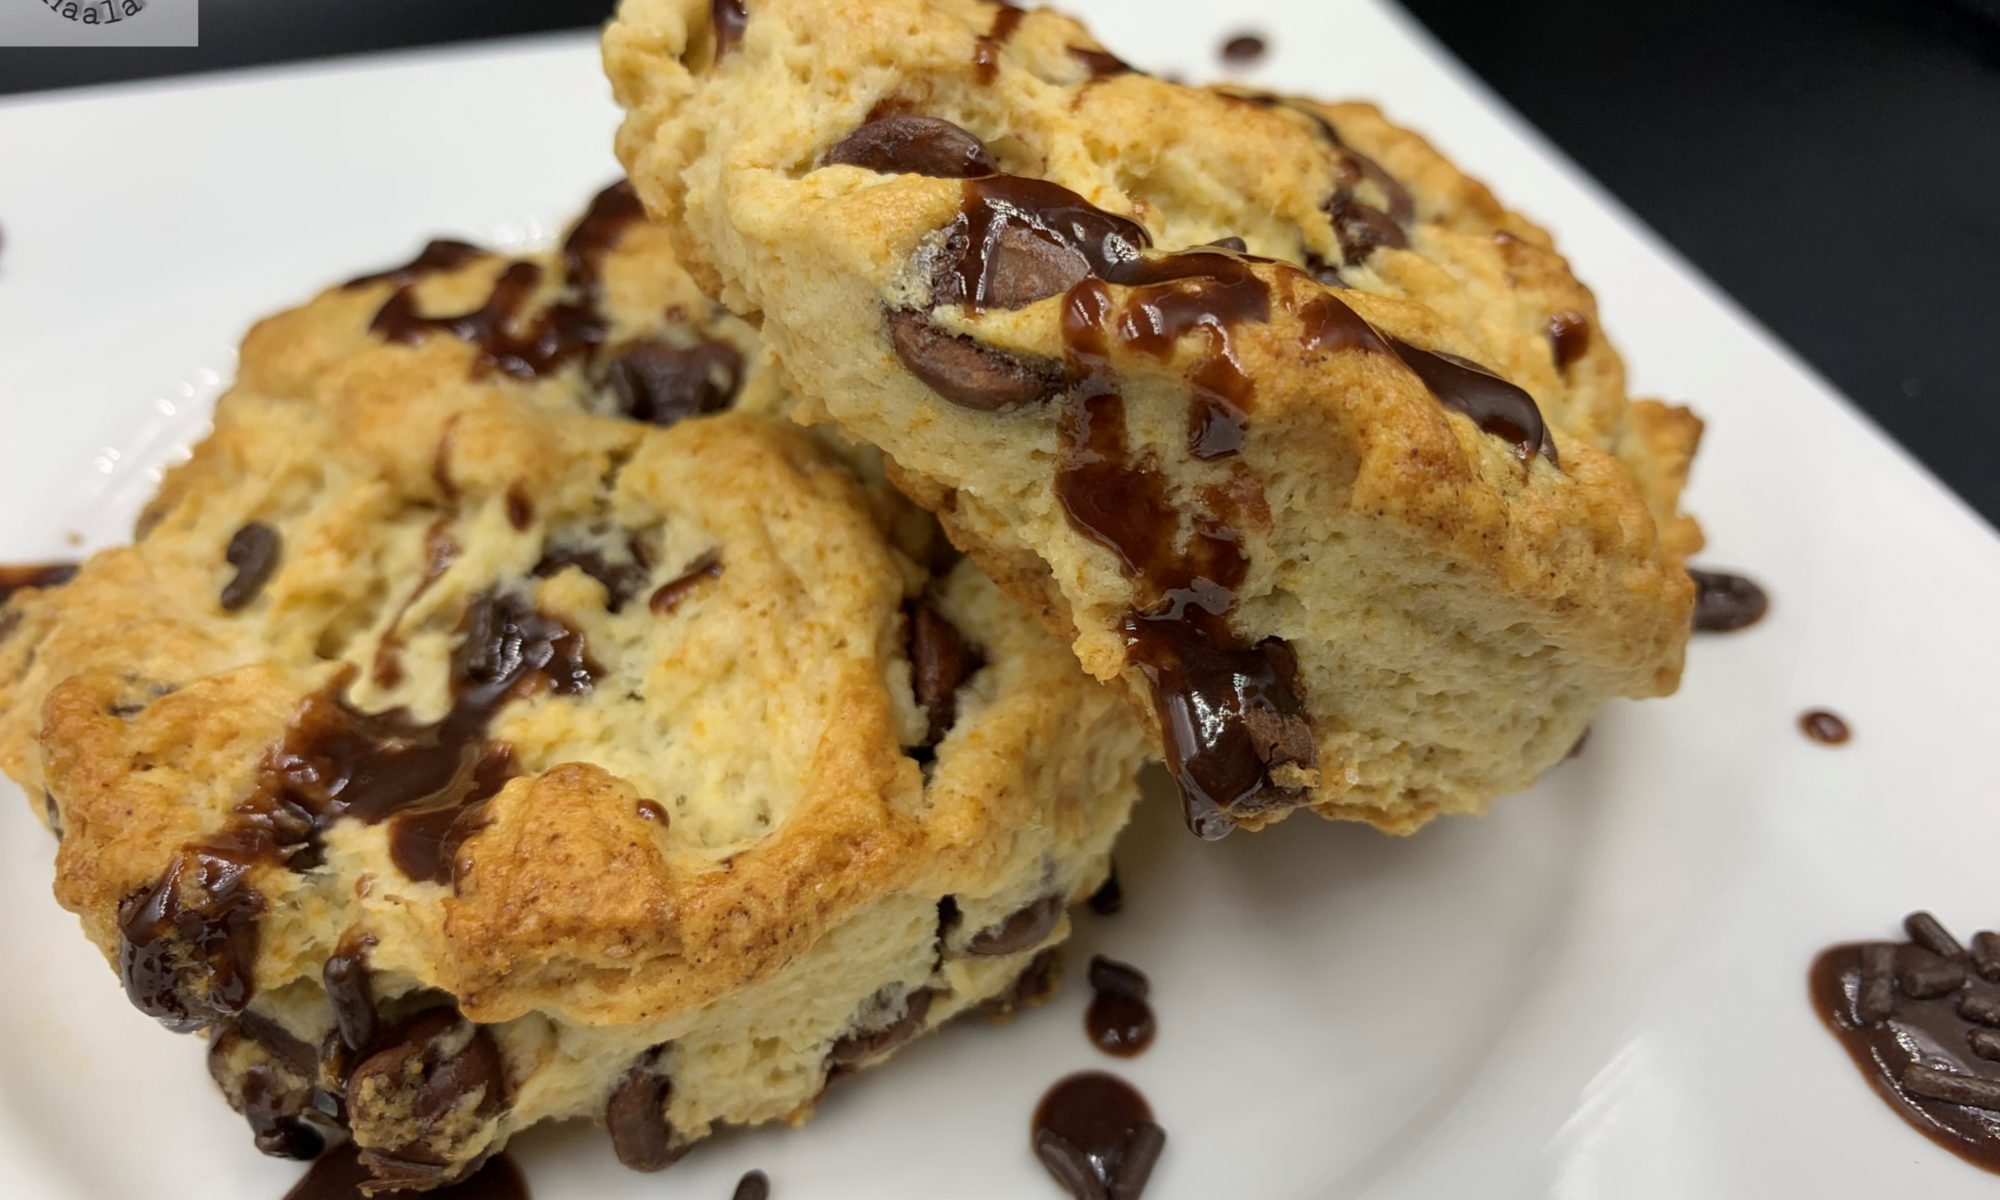
After trying my hands on the delicious, airy and scrumptious British scones, my kids had always been after making them. I have already made them numerous times, I felt it was time to experiment with something new. One of the main reason behind trying out the Chocolate chip scones was Mr. Parveez. When I made the plain scones, he mentioned that he loved the chocolate chip scones at a Book store cafe which he visited on some weekends before we got married and he loved them.

Therefore, I felt my second trials have to Chocolate chip scones. these scones are pretty rich, chocolaty , slightly sweet and just melt in the mouth. They are pretty easy, simple and fast to make, crunchy exterior and soft interior make them extremely satisfying. I make scones in a traditional scone way where I patted the dough around an inch thick and then cut them with the help of a biscuit cutter. But you can also roll the dough into a circle, around 8 inches and cut them in triangle shape, like a pizza. You can cut them into as many as you like, as long as the width is around an inch.

The butter you use should be cold because if it melts too soon, your dough wouldn’t be crumbly. If the dough gets super soft for any reason, because the butter you used was on room temperature or melted, then place the dough in the refrigerator for 30 minutes to an hour, till the dough is good enough for you to handle. The heavy cream used in the recipe is an approximate measure. It honestly depends on the flour that you are using. If the dough doesn’t come together easily and if you feel its still dry, add a little more cream, little at a time. Similarly, if the dough is too sticky and gets hard to handle, you can always add a little more flour, one tablespoon at a time. Avoid overworking the dough, because scones do not need too much mixing. Less mixing makes softer scones. The dough should be soft, not sticky.

Scones are best when you serve them fresh out of the oven. If you have extra, its always better to freeze the dough and bale it when you are ready to eat. You can freeze them up to 2 months in an airtight container. When you want to use it, just thaw the dough and use it.

Plum Cake

Plum cakes are just so special. Christmas all around the world is always so festive and beautiful. I love the old city charms, snow and the gorgeous decorations everywhere. Though, things were pretty festive while I was growing up but in a little different way. I went to catholic convent school and Christmas was always celebrated in an awesome way. The teachers, nuns and students would always put up a grand show on the last day before the Christmas break. One of the teachers would dress up as Santa Claus and distribute gifts to everyone.

What also made me look forward to Christmas in India was Plum cake. For some reason, Plum cake was always made only during the Christmas season. A local and very popular bakery in my hometown made delicious Plum cake and my father made sure he gets ample supply for the family because we all loved it and it was only available for a short period of time. Not just that, I would always look forward to visiting my Christian friends on Christmas and would love their awesome cake preparations on Christmas. Being a Muslim, we couldn’t eat Plum cake everywhere, since most people soak their dry fruits in Rum for a month or more and we could never try those. Thank God! the bakery was owned by a Muslim family.

I could never figure out what exactly they soak their dry fruits in and how exactly they make it so delicious, yet not adding any alcohol and making it exactly the same way as its traditionally made was simply amazing. But, of course, no baker would ever share the recipe, Right? and so, we would just enjoy the yummy Plum cake while the season lasted. After getting married, I discovered that Bangalore’s Iyengar bakeries have a non stop flow of Plum cakes all year round and since, we were travelling to India only during summer. Not just that, we also searched almost all bakeries in Indian areas in New Jersey only to find out that Plum cakes are not in demand so they don’t make it.

Most recipes you search will always ask you to soak the dry fruits in Rum or some other kind of alcoholic beverage and there is no alternative to it. Finally, I got this recipe from a friend’s aunt who happens to bake a traditional Plum cake for the family every Christmas and does not use alcohol. Initially I wasn’t so sure how the cake would turn out, because a few things in the recipe are not hard but slightly tricky but, once you get the hang of it, its a walk in the park. Just make sure you red and follow all the directions mentioned. I promise the cake will make you relive those beautiful childhood memories.

Malabar Shrimp Curry

Shrimps are one of my favorite kind of seafood and I would always try shrimps with new kind of gravies or new styles of marinade and fry them or grill them in different ways. Mr. Parveez always preferred eating an actual fish to eating shrimps. He finds Shrimps to be a little tasteless. So, when I started making Shrimp curries, he was still not a big fan. He would eat, but you know not really enjoy it as much as how I would like him to.

We watch a lot of travel shows and during one such show, the host happened to be travelling around restaurants in Kerala and one such restaurant was cooking Malabar shrimp curry. Now before anything let me tell you this. We were watching this program around an hour or so before dinner time. While the chef in the restaurant was showing how he prepares his special Shrimp curry, we were glued to the TV and wished we could see it live in person and have a bite of that scrumptious looking curry. Anyways, just as I mentioned that it was around an hour or so before dinner. Looking at that curry, I was determined that I have to try making it. Funny enough I remembered that my freezer has a pack of frozen shrimps. I always believe in miracles and this might have been one such lucky day. I got down to making it that very moment. The curry came out amazingly delicious and a family favorite too. Now the chef had only given in a rough idea on how to make the curry and few things that I have added to my curry recipe was not a part of the show that we watched. So, you might not find this different from an authentic Malabar Shrimp Curry, but you will definitely get the hint of Malabar flavors and savor each bite.

I deveined the shrimps but left the tail on. I feel it makes the shrimps look prettier in a curry, but you can always take the tail off if you prefer. After washing and pat drying, I marinated the shrimps in Ginger garlic paste, Red chili powder, Fennel seed powder, Tandoori powder, salt and lemon juice for 15-30 minutes. I also added a bunch of curry leaves. Further added some Rice flour, All purpose flour and corn starch powder and deep fried the shrimps. Frying makes the shrimps crunchy and the texture with the curry sauce is very flavorful.

To make the curry, add mustard seeds and fenugreek seeds along with dry round red chilies. Once they splutter, add curry leaves and further add chopped onions. Add ginger garlic paste followed by black pepper powder, Turmeric powder, Red chili powder, coriander powder, fennel seed powder, salt and cumin powder. Add the Dry red chili paste, tomato puree and green chilies along with fried shrimps and dry fenugreek leaves.

This shrimp curry is pretty easy and would make a special place in your menu. Its goes along great with garlic naan or plain naan and also Kerala Parantha.

Chocolate Chip Cookies

Chocolate Chip Cookies, the name makes my mouth water. My undying love for chocolate chip cookies never goes away and there is no time when I don’t crave them. Warm cookies straight out of the oven and a hot cup of coffee is enough to rejuvenate anyone from their super tired day. Have you ever noticed all the cookies in the cookie aisle at your favorite supermarket. Its a huge variety. Sometimes, when you think of trying something new, a picture on a pack or the beautiful explanation of the scrumptious cookies or a popular brand name or company introducing something new, by modifying a little something in their older version is enough to lure you into trying something. I never paid attention to the details of the ingredients until my older one started developing a taste for them. That’s when I realized that I was feeding my son things that I not only did not know, but found them had to pronounce. Ingredients that sounded better in a chemistry lab than on food. This is when I decided that I should try and bake my own cookies, I mean how hard can it be…LOLzzz. But, let me tell you, its tough. Baking, not so much, but baking in the right temperature, making sure the heat is just right, is difficult. Plus, the proportion of ingredients has to be proper. A little more butter than required won’t make the cookies softer, but break them apart. A little more sugar won’t make them sweeter, but too sweet for your taste buds. Therefore, the first rule, measure everything. This recipe is plain chocolate chip cookies, craved by all, loved by all and eaten by all.  The website has a recipe for Chocolate chip cinnamon cookies too, but please do try these ones as well. Once you try these you will never buy your cookies from the store or any bakery ever, that’s a promise. Each bite is chunky and heavenly. Enjoy!!!

Hyderbadi Lukhmi Dough

Hyderabad is also popular for its Biryani and Khubani ka Meetha. Along with that, there are loads of other popular Muslim dishes that are very popular in Hyderabad but probably not that popular outside Hyderabad. One of those dishes is Lukhmi. It is a typical rectangle/square samosa kind, which has a filling of mince meat or Chicken. Its regarded as savory or starter of the cuisine of Hyderabad. It is a local variation of samosa. Though have never visited Hyderabad, but I do want to visit it one day. 2 simple reason to it, one of course is Hyderabadi cuisine and second is the Falaknuma Palace that simply became more popular after my favorite Bollywood actor’s sister got married there…LOLzzz. I know sounds crazy, but speaking my heart out is what I do on my blog and it is what it is. So, going through popular Hyderabadi cuisine is when I came across Lukhmi and that’s when I decided to make it. My boys who are big fans of Samosas, I was kind of unsure if they’d enjoy Lukhmi. Honestly, since none of us had ever tried it before, I wasn’t even sure how it will turn out to be. But, to my amazement, not only did they love it, they went a step further by asking me to make this more than samosas, which honestly is a shock to me because my kids can kill for my chicken samosas…Okay!! May be not kill, but definitely injure someone enough if anyone dares to even look at their samosa, forget eating…LOLzzz.

 Hyderabadi cuisine has a variety of scrumptious snacks, and Lukhmi, the flaky savory stuffed with spicy minced meat/chicken is definitely one of them. A popular starter at Hyderabadi marriages, this dish also works well for a quick pair for teatime with family or friends. The name lukhmi originates from the word luqma, which means a small bite in Urdu. Unlike the samosa, lukhmi is usually a flat square/Rectangle shaped flour parcel with a flaky and crisp upper crust and stuffed with beef, chicken or mutton-based filling. You have the snack in other shapes like triangles in some cafes and a vegetarian version mostly  with potato filling is also available.

It is usually served with chopped onions and green chilies or chutney. To prepare lukhmi, all purpose flour/ Maida is kneaded with milk, butter and a little water. The mince or vegetarian filling is cooked separately, with turmeric, onions, ginger, garlic and spices. After resting, the dough is rolled out into a huge rectangular roti. More butter is added in between rolling the Roti and refrigerating it for 20 minutes or a little more. This process is repeated 3-4 times in order to create more flakes or layers to the Lukhmi. After the final process, the Roti is cut to multiple squares. Finally, these multiple small squares each housing a filling pocket forming a Lukhmi.

The edges are closed by pressing them often with a fork, and the stuffed parcel is deep fried in oil. As the color of the patty changes to golden while frying, the lukhmi is ready for consumption. The snack had lost some of its popularity over several decades, as many places in the old city stopped serving it. However, it has made a comeback of sorts in the last few years with an increased interest in lost Hyderabadi recipes.

I really enjoyed making these beautiful and scrumptious pockets of goodness and these are now a family favorite for me. I hope you like them too. If you need help with variations, please feel free to ask. Enjoy!!!

Hot Chicken Sandwich

We all love sandwiches, specially hot/warm sandwiches if well made just make your taste buds dance and enjoy every bite. There are so many varieties that I make and my boys still never seem to have enough. I sometimes feel that they look at me and see a food invention machine because I work according to their wants and cravings and sometimes, invent something by mixing up 2-3 of their favorite flavors which makes up a new dish and is loved by all.

This Sandwich seems to be one of those. My boys are big fans of hot and saucy Chicken wings. Once when our nearest Halal grocery store was out of Chicken wings and my boys were craving them, I made Boneless chicken and mixed them up with Hot and spicy chicken wing sauce and they loved it. It was like an added variety which was created in a fluke. Not just the chicken wings and the boneless hot chicken stripes became popular in my house, even their friends started making requests to make them for play dates and I did.

After few weeks, and making multiple different sandwiches, I came up with the idea of hot chicken sandwich. Not sure how my critics [my husband and kids] would react, I made it without a discussion of what they would think of the combination. Trust me, this will just blow your mind and the people you make it for will not stop praising for serving them with something so wonderfully delicious.

The recipe is pretty simple to what it turns out to be. I am pretty sure if you ask someone to guess the recipe after the first bite, they will assume it to be something difficult, but honestly it’s pretty simple and easy to make and if you just follow the recipe steps as elaborated you will not just be able to serve a great sandwich, but also your chicken will have a super crunchy and crispy exterior and the inside will be juicy and flavorful.

So, basically to start with I cut the boneless chicken to thin long strips. I then marinate the chicken in egg, milk, lemon juice and spices for around an hour. You can definitely do it longer if you wish. Usually 30 minutes is fine too. Make sure the chicken is completely soaked in. After that the chicken has to be rolled in a mixture of flour, spice and crushed cornflakes. We then deep fry the chicken pieces. The sauce is made using hot sauce and butter. I also used extra red hot chili powder, which you can always omit if you do not prefer your hot chicken less spicy. Add the chicken pieces to the sauce and then add them to the long Italian bread along with sliced onions, garlic mayo sauce and shredded cheese. Let them bake in the oven at 350F for 8-10 minutes. Serve hot/warm. Enjoy!!!

Haala’s Zingers

My boys prefer home lunches and also love varieties for their lunch. When I use the word variety, I mean that they would not want a dish to be repeated in 2-3 weeks and believe it or not, its a lot of pressure to make something that tastes great and that they would love it as well.

These chicken burgers are a very close copy to a famous food chain. These are easy to make and can be easily made by beginners as well. The chicken does not have to marinated for too long and even the process of marination is with pretty simple ingredients. This is great dish if you have boneless chicken available and haven’t thought of anything in mind, and need to get things ready in a rush.

My boys love these zingers and believe these are one of my best creations. Since its not possible for us consume Chicken outside in USA, trying to come up with our own is the only option. But, since India has a halal option for almost all food joints, we have tried the burger and my kids actually told me that this tasted way better [I know, I am raising them well to please their mother]. But, I like the fact, that its fresh, homemade and you know what you are putting in your child’s plate. You might be able to air fry the burger. Though I have an air fryer, I always feel that it makes food extremely chewy. And then again, when you are cooking at home, ingredients are more fresh, no preservatives are added so, cooking things the way they should be cooked makes kids happy too. I am against messing up food giving it the label of being healthy. You don’t want your kids to go off basic food. You just teach them to make healthier choices and eat well.

I usually make this and serve it with a different spicy sauce . The recipe for the spicy sauce is in the sauce section. A blend of mayo, ketchup, hot sauce and mustard sauce goes perfectly with this spicy zinger chicken burger to give that kick to this sandwich.

Halwa Poori

Halwa Poori is a traditional Bangalore dish, popularly made by Muslim families specially during weddings. During a wedding, a no. of food items go from the Bride’s side to the Groom’s side, which also includes Halwa Poori. There are also numerous occasions when they are made at home, but they kind of always need a special reason. I have no idea where the tradition came from, but it does have a little Mughlai influence and that’s why the traditions are carried on by Muslim families. The reason probably is also because it a tedious job making them, requires time and effort and usually made in a large batch too. When made, its always distributed among relatives, friends and neighbors. When I first saw Halwa Poori, it reminded me of Diwali Gujiya and honestly I have never been a fan of Gujiya. I always found them too coconuty and I also felt that it was always too dry and the dry coconut would start falling out if not careful. I also felt that if there was something that was nicer, softer and sweeter and Halwa Poori seemed to be a perfect answer to it. Halwa is made of Chana daal, coconut, Khoya, Milk and sugar cooked together in ghee/ Oil. The poori is made from All purpose flour. The halwa is filled in the poori and then sealed and fried. The traditional recipe is great and awesome if you are serving a large no. of people in a day or two. After that they kind of get a little mushy unless you keep them in a perfect airtight container. When I started making Halwa Poori, it always is great in taste. And then I decided to bring a little twist to this recipe and instead of the regular dough, I switched to Puff pastry dough. So there is also a recipe with Halwa Puff Pastry. And, for the Halwa, I can make and refrigerate it for up to 15-20 days. The Halwa can also be eaten minus the poori or puff pastry. I hope you enjoy making this as much I do..Its definitely a great recipe.

Pizza Dough

The secret to a perfect Pizza dough recipe? Easy to follow step by step photos that will give you the perfect Pizza dough. You will never have to look for another Pizza dough recipe ever. I have actually been waiting for so long to write down the recipe for this dough, since I know there are so many like me who would love to make pizza at home. One of the best things about making homemade Pizza is that you can always involve your kids and family and it can be so much fun.

The secret to making a perfect Pizza dough at home is the water temperature. You just have to make sure that your water temperature is perfect. I am not going to ask you to boil it, or microwave it , even the water that comes out of the fridge or tap, all work different ways. The temperature should be between 110-115 degrees Fahrenheit or between 43 to 46 degrees Celsius. The best thing would be to use a thermometer. If the water isn’t hot enough, it won’t wake up the yeast. If it’s too hot, it will kill the yeast. Only the correct temperature will bubble up the yeast perfectly. I have wasted loads of dough, thinking even if my yeast didn’t bubble up, my dough will work out fine, but it failed to rise resulting a wasted dough. Until I realized that the temperature has to be perfect. After a few trials you will be able to tell by touch. A candy thermometer should work just fine. Dump your water and restart if its not correct. You add around 2.5 tsp of yeast and little sugar. It doesn’t need stirring. Let it sit for around 5-7 minutes and it will be nice and frothy on top and this is when you know that the yeast will make the perfect dough.

When you are measuring you flour, make sure you scoop the flour in a measuring cup and level it. If you scoop it out right from the container, you might end up getting more flour than needed. If your dough isn’t coming together well, because may be accidentally added more flour than required, then add a tiny bit of warm water, just few teaspoons at a time until it comes together.

If you like the pizza dough recipe, leave me a 5 star and a comment. I would also love to know what your favorite toppings are. Enjoy!!!