Hyderabad has numerous varieties especially when it comes to Biryanis. I have tried making a wide range of different styles of Hyderabadi Biryanis. Each one has its own distinct flavor and ingredients. I always love how beautifully the heritage of Nizams is displayed in Hyderabadi food.
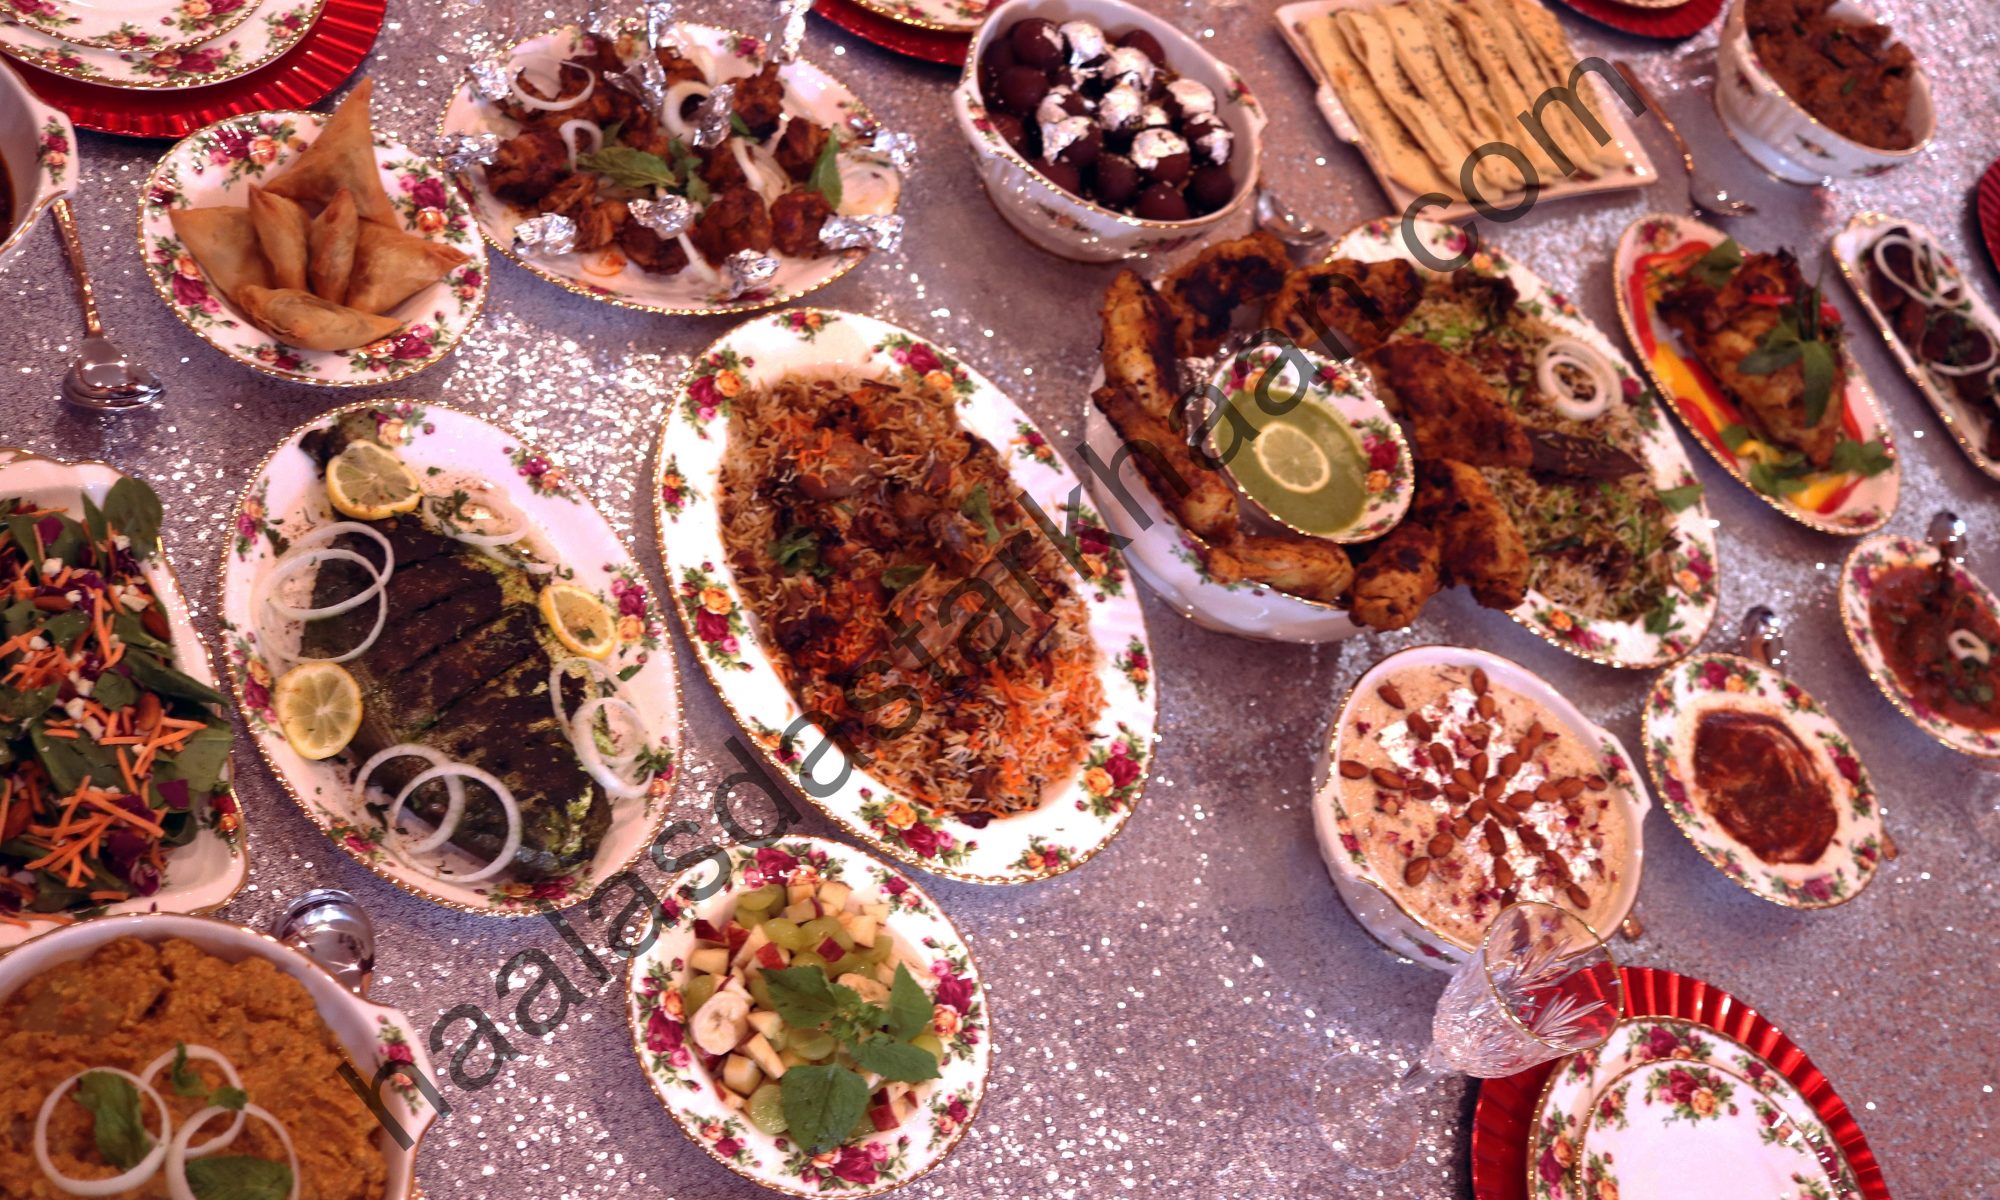
The dishes are not just rich in ingredients but also the recipes show how rich the food culture has been with the Nizams. We always hear stories of how generous the Nizams were when it came to entertaining and welcoming their guests. How lavish their Dastarkhaan or tables were. The curries, Haleem, so many varieties of sweet dishes that are served with oodles of dry fruits and cooked in clarified Butter are evidence of how much effort the Nizams made their Khansamas/chefs put into food.
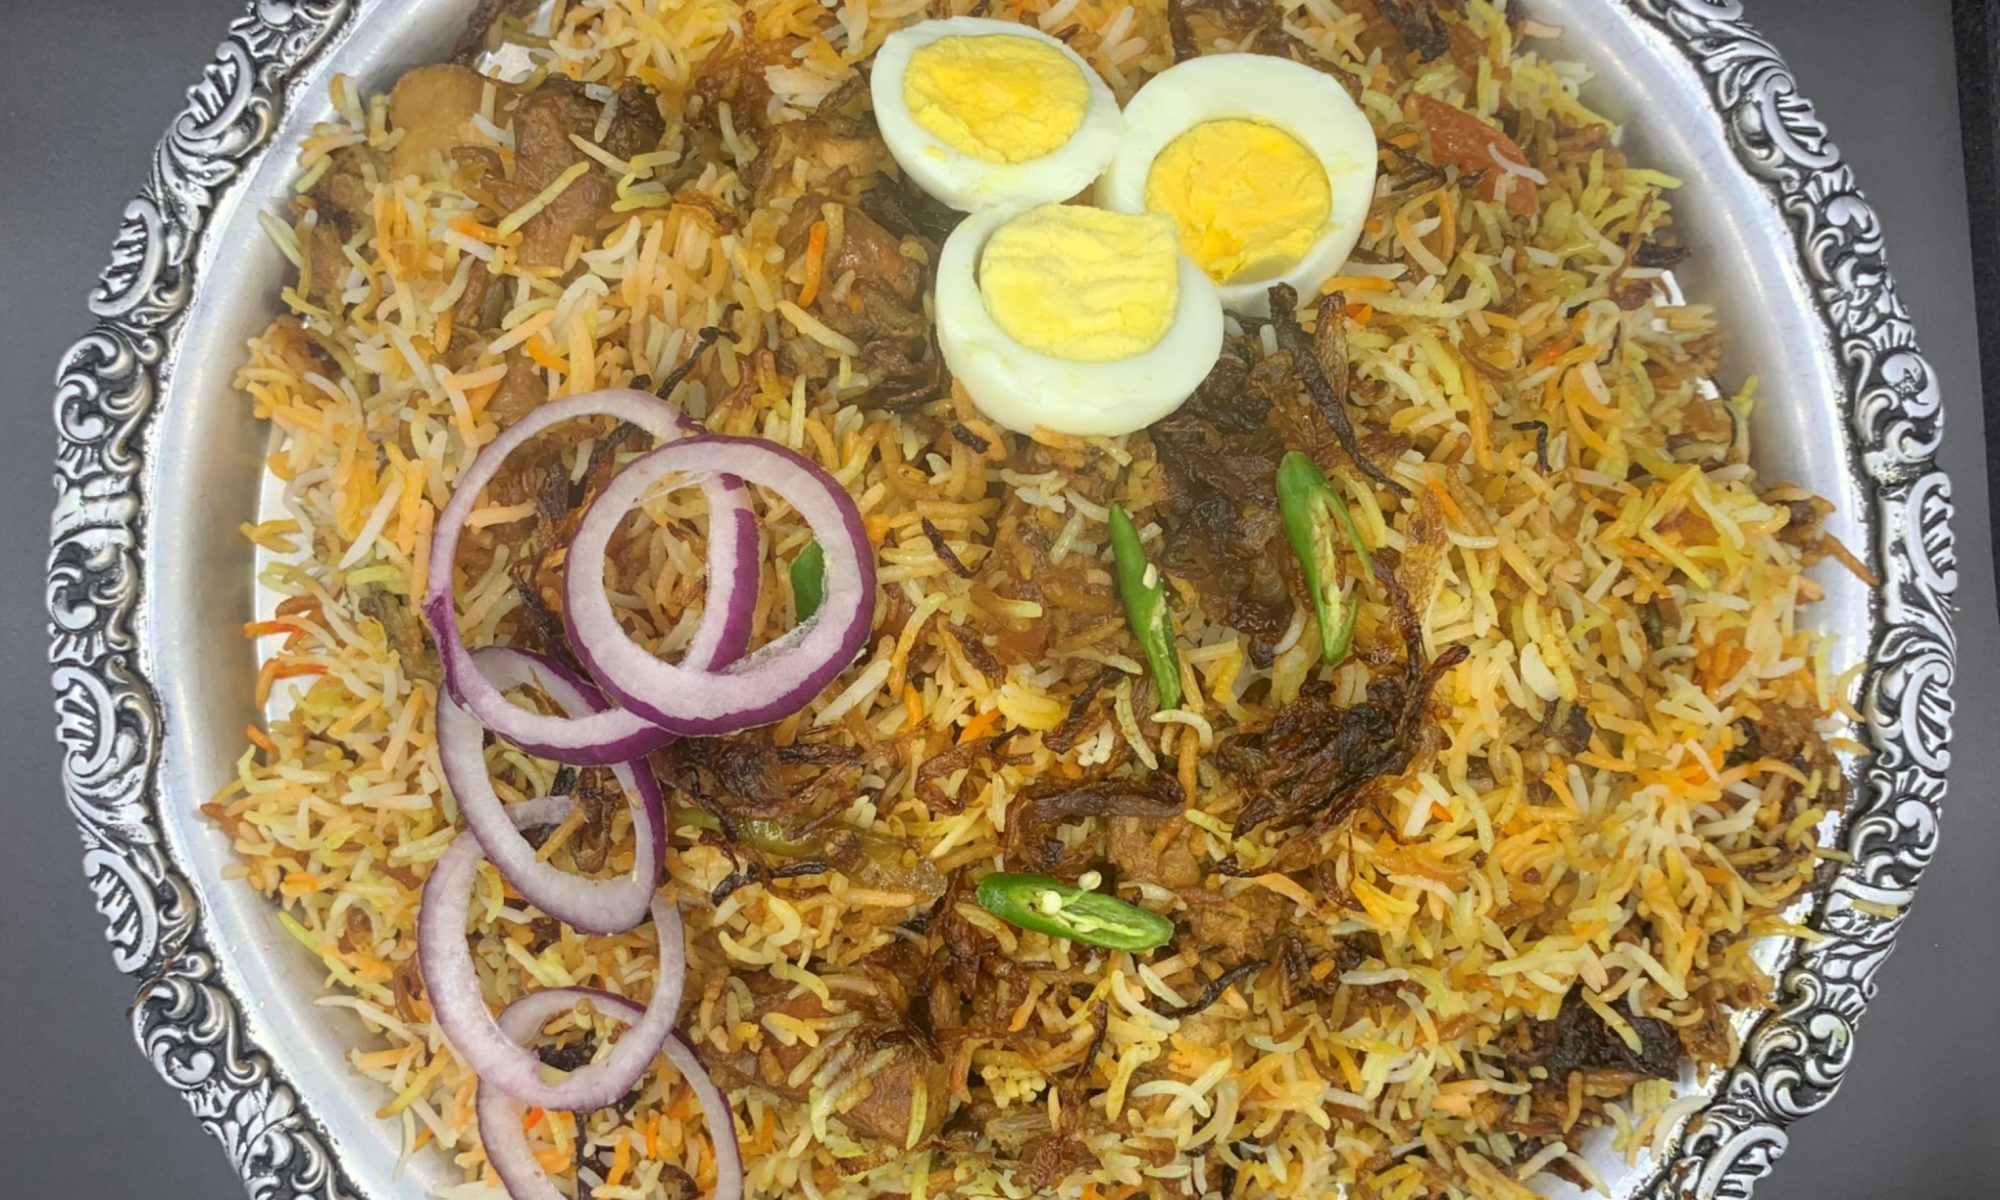
The Nizams were very influential. The history showcases the rich taste not just in Gems and Jewelry, but also in food. The use of Milk solids, Ghee, Dry fruits of different kinds is pretty common in most dishes. This dish has a paste of poppy seeds, cashews and coconut. Though the spice level isn’t too high, the Biryani uses a paste of green chilies and you can always increase the green chilies if you wish to make it spicier. Using Kewra with food color makes the Biryani smell rich and inviting as well. Besides that the Biryani is pretty easy to make. This dish is great for Beginners too. Enjoy!!!
With the wide variety of Kebabs that we make, we love kebabs made from meat the most. I love the way meat Kebabs are always so juicy and tender and absorb all the flavors so naturally. The texture of meat and the spices blend in so well together. I am sure if you look into details of cooking that when it comes to Kebabs, meat Kebabs definitely make to the top of the list. I have heard a lot of people liking Beef too, but since I have never cooked or consumed beef, I don’t really have an idea. But I do think that since Beef has a lot of fat, cooking with its own fat must be adding more flavor to it.
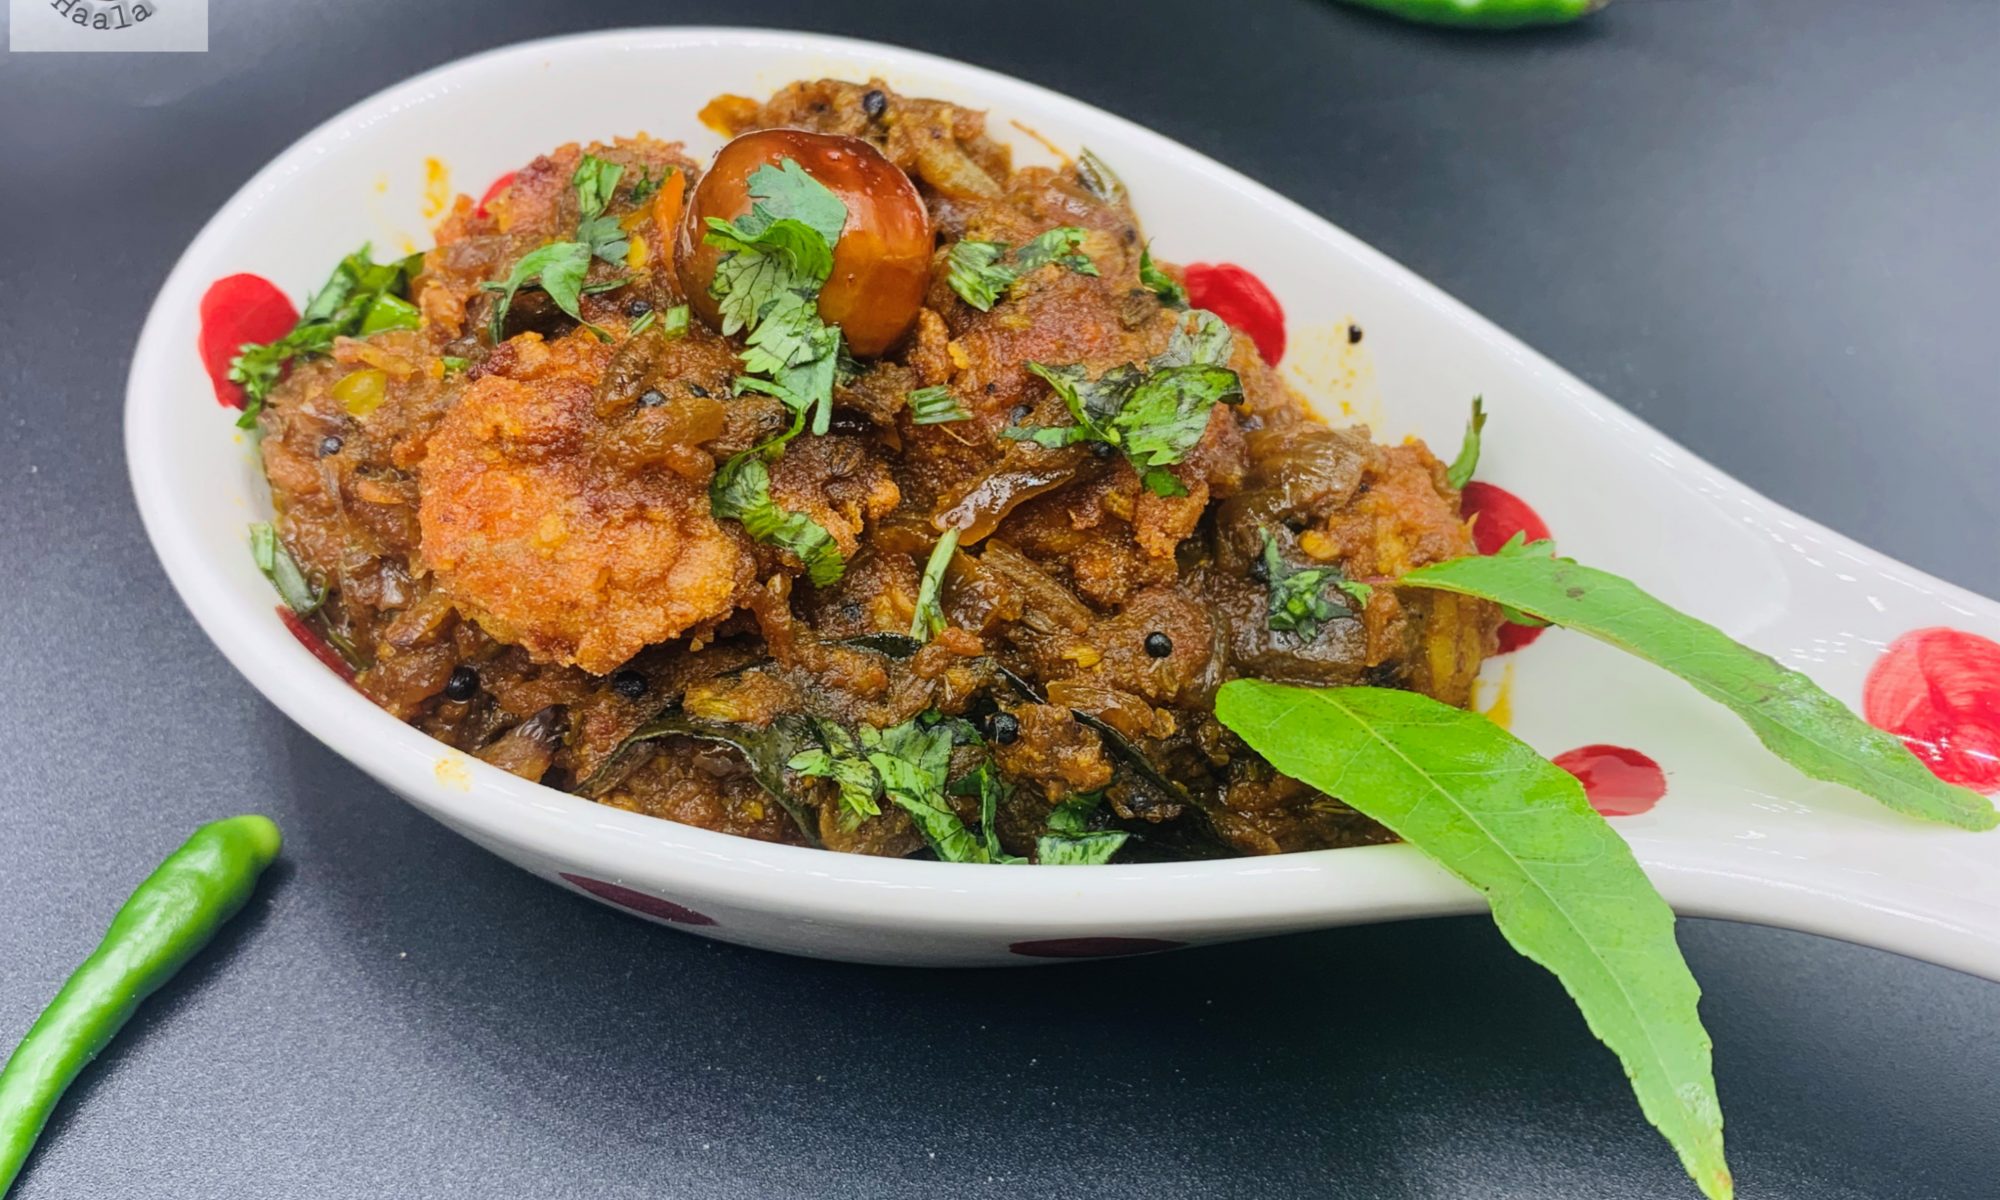
Coming back to Ghee Roast. I came across some cuisine where they mentioned the dish and showed how the meat is boiled till it’s cooked. after roasting the whole masalas, they are ground to a powder, and then the meat is cooked in ghee with spice powder, onions, curry leaves, and green chilies. This dish is pretty easy to make and makes it to my top ten list of easy and flavorful kebabs.
The best thing about these kebabs is that they can be partly premade a few days in advance as well. You can boil the mutton a few days in advance and refrigerate or freeze it, depending on how many days you want to use it. Similarly, you can always dry roast the whole masala and grind them and store them in a dry and airtight container. These kebabs are juicy, moist, flavorful, and go really well as a side dish or by itself. If you are a fan of meat kebabs, you will love the scrumptious chunks of flavorful meat. Enjoy!!!
Chicken Kebabs are an all time wanted and favorite for everyone. Chicken Kebabs go so well with Daal Chawal as a side dish and even by themselves. I love making Chicken Kebabs for my get together with friends as well. People always feel that you cannot experiment much with Chicken Kebabs at home, where as experimenting with different Kebab flavors at home is the best thing to do.
The basic thumb rule is follow the fragrance and the flavor. If there are spices that go well together and there are spices that don’t go too well. Spices like Black pepper is something that you need to add little at a time, since if its too much the dish tends to get bitter. If you need to enhance the flavor of Black pepper in your dish, its always better to add less of Black pepper and more of White Pepper to balance the pepper taste. Adding Tandoori masala gives a lot of kick to Red chili powder and makes kebabs more flavorful. You can always use citric acid in place of Vinegar or Lemon juice. Adding Flour with Rice flour and Corn starch Powder will add a lot of crunch to your kebabs if you are frying them.
With the Hyderabadi Chicken 65, I added Red chili powder and other spices with Ginger garlic paste and mixed it well. Further rolled the spiced Chicken pieces in Flour, Rice flour and cornstarch powder and fried them. Later cooked them in a sauce made with Onions, green chilies, various spices and Yogurt. I also add a little cornstarch powder to the gravy to make it a little thicker.
Chicken 65 is made in different ways in different places of India. Though the original recipe was made in Chennai, but different places modified their ways and made it suitable to their taste buds. Honestly, every pace has their unique flavor and we always tend to have our favorites but making them in different ways is always great to add more variety to your dinner table.
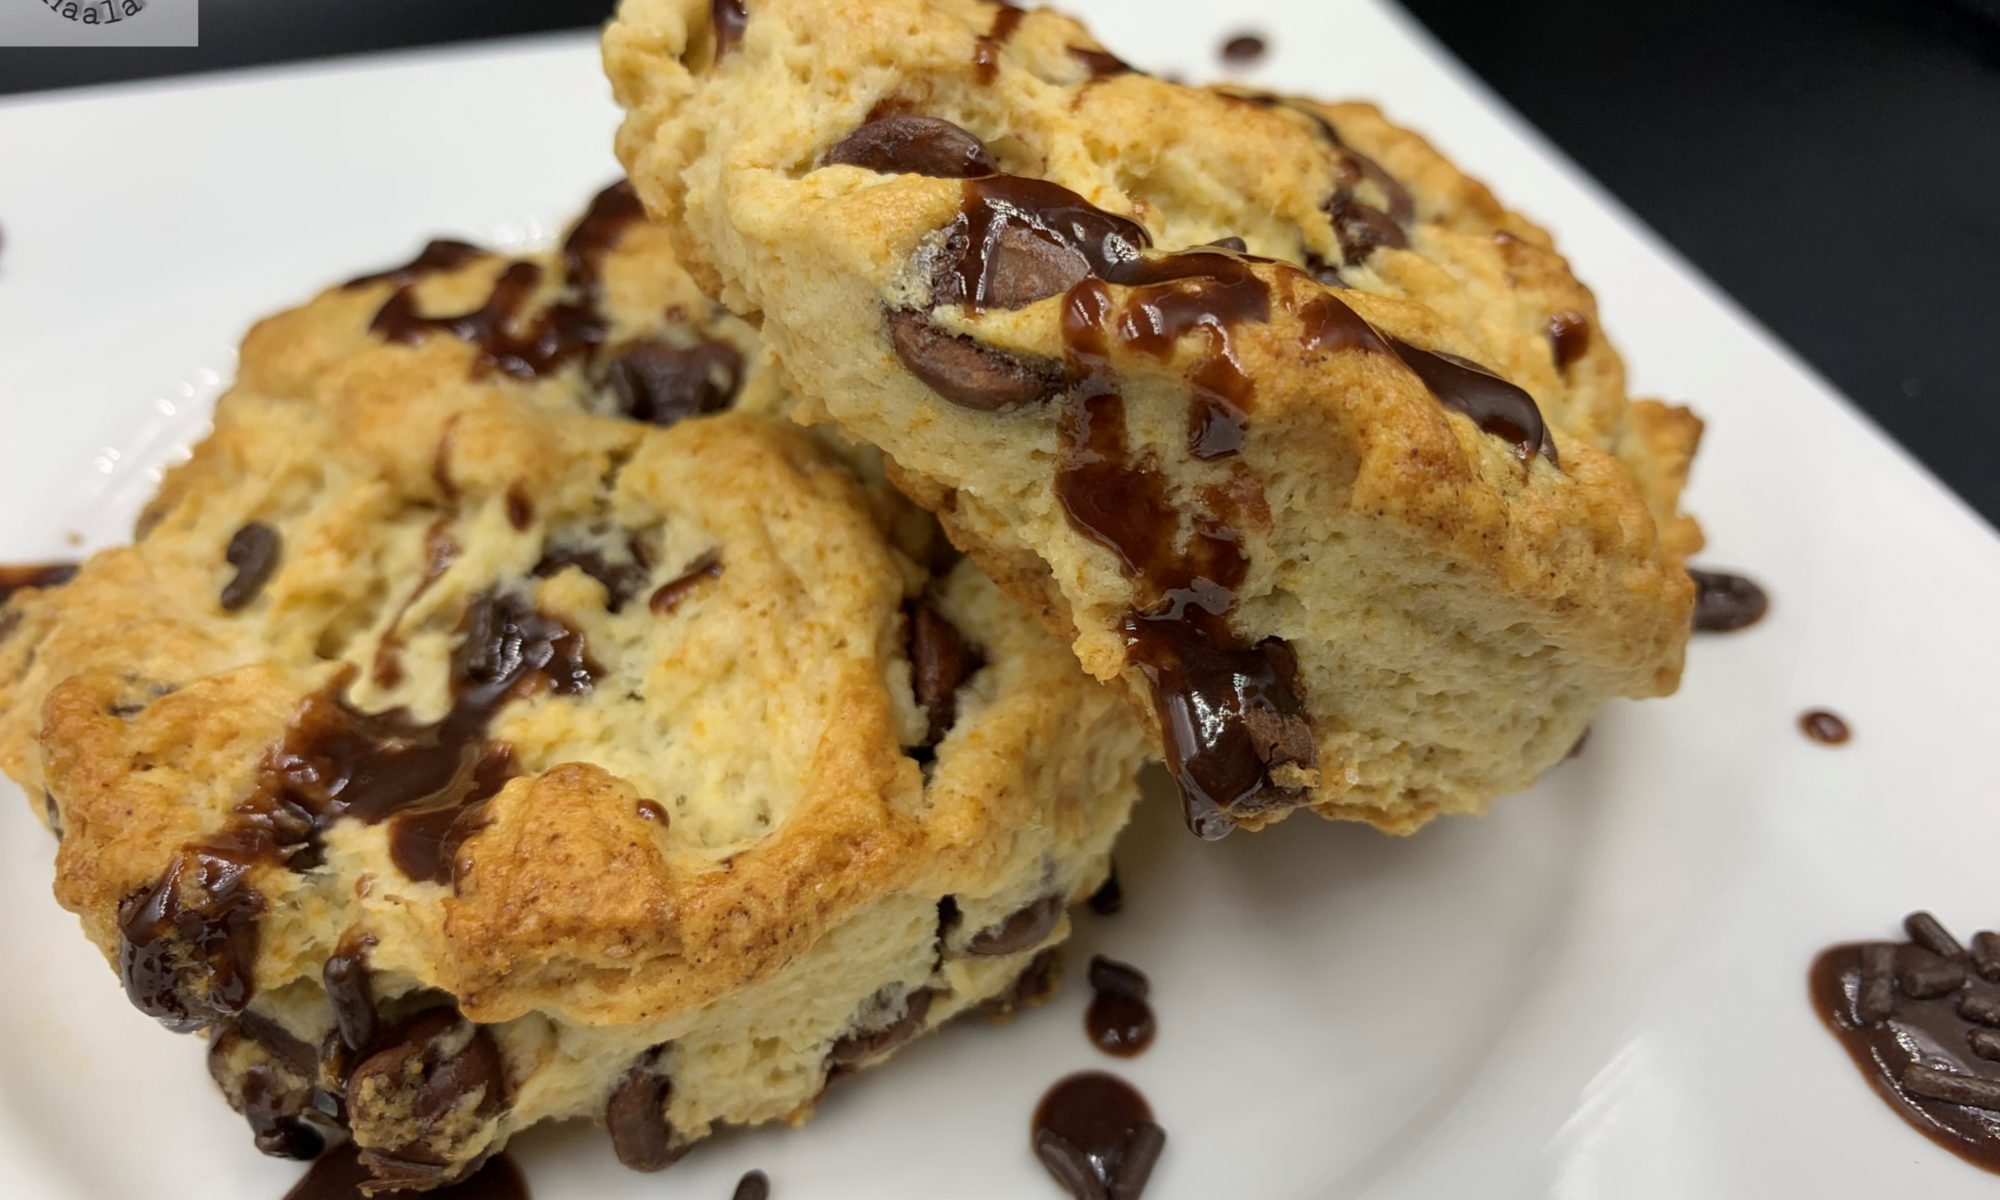
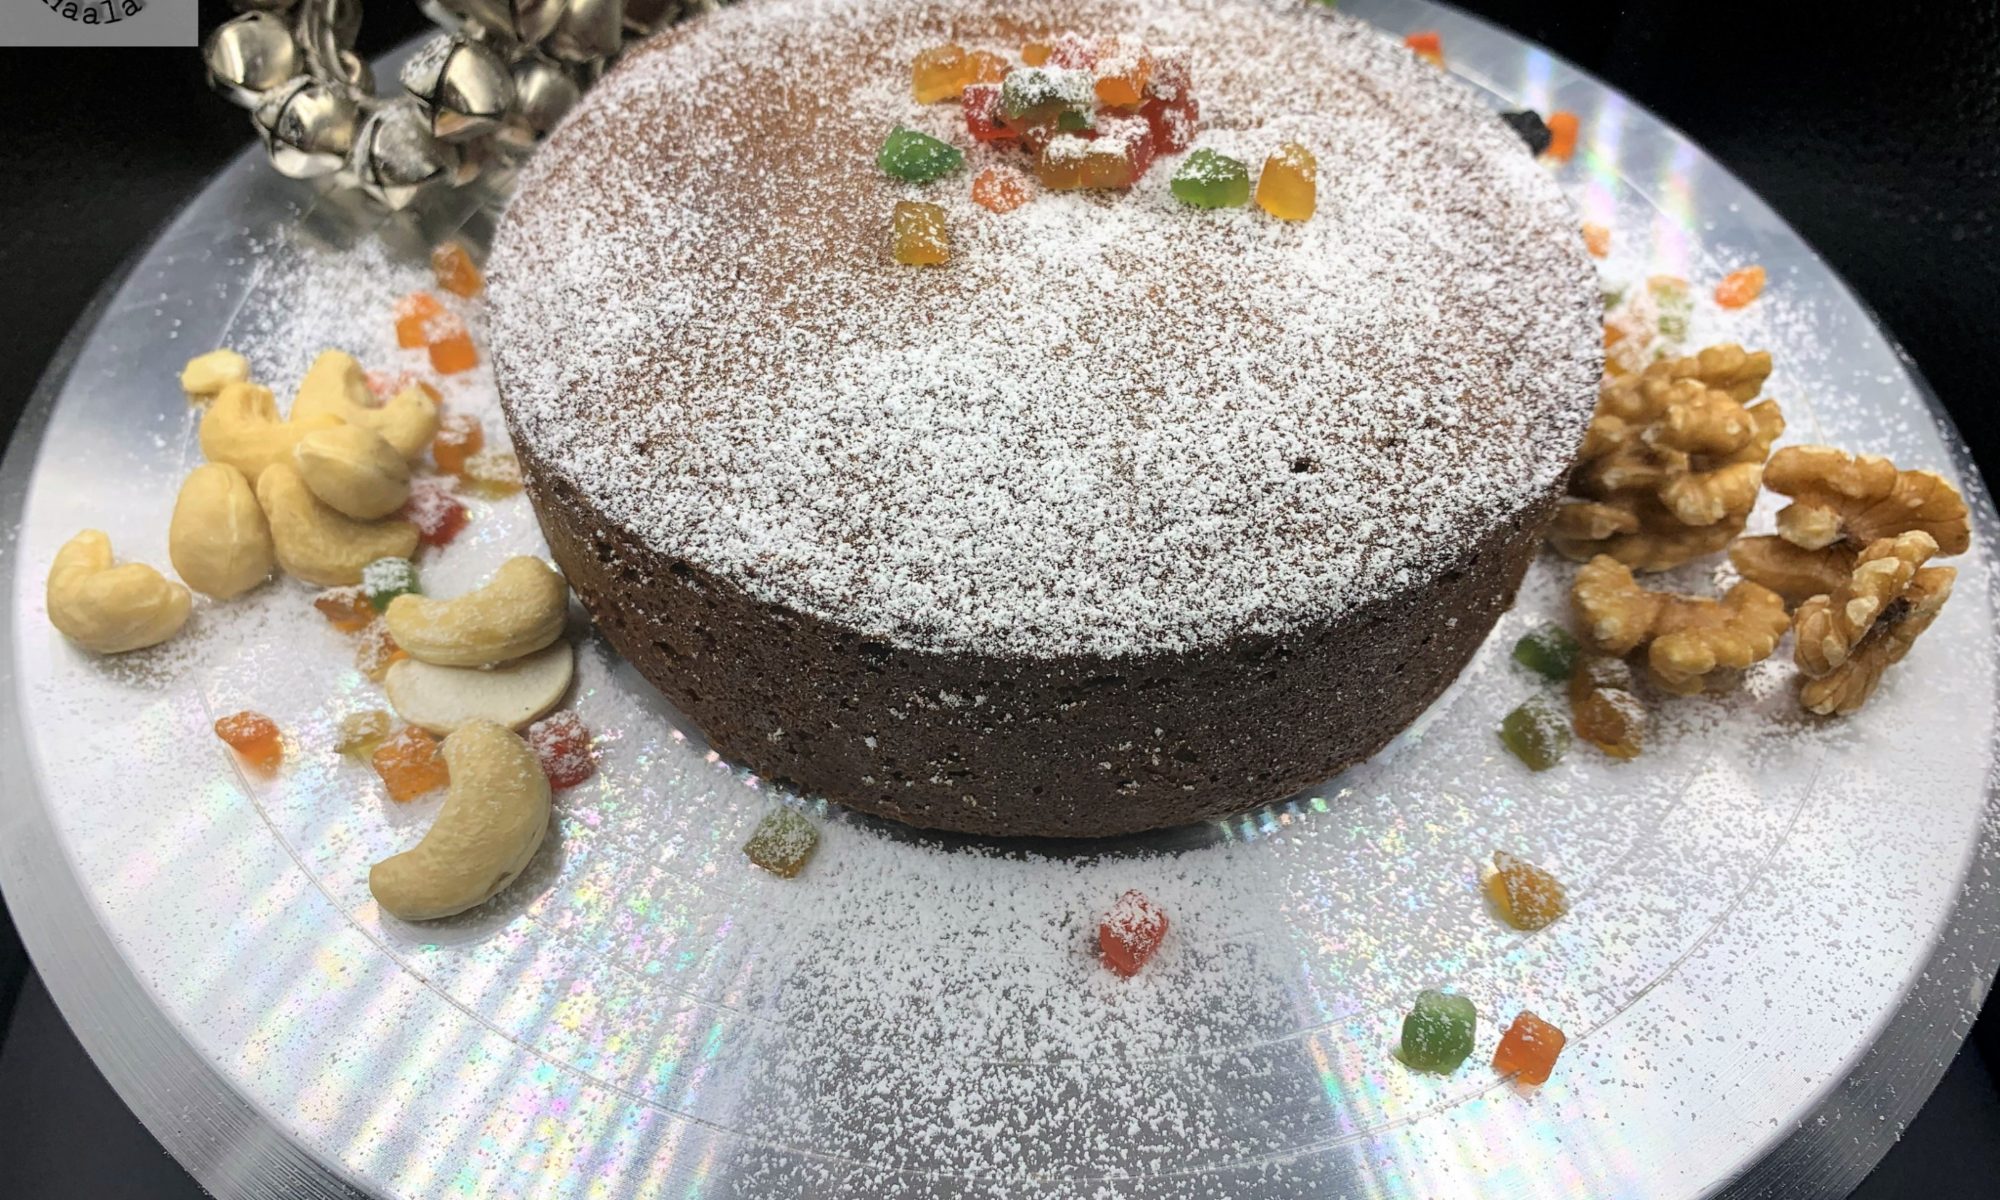
After trying my hands on the delicious, airy and scrumptious British scones, my kids had always been after making them. I have already made them numerous times, I felt it was time to experiment with something new. One of the main reason behind trying out the Chocolate chip scones was Mr. Parveez. When I made the plain scones, he mentioned that he loved the chocolate chip scones at a Book store cafe which he visited on some weekends before we got married and he loved them.
Therefore, I felt my second trials have to Chocolate chip scones. these scones are pretty rich, chocolaty , slightly sweet and just melt in the mouth. They are pretty easy, simple and fast to make, crunchy exterior and soft interior make them extremely satisfying. I make scones in a traditional scone way where I patted the dough around an inch thick and then cut them with the help of a biscuit cutter. But you can also roll the dough into a circle, around 8 inches and cut them in triangle shape, like a pizza. You can cut them into as many as you like, as long as the width is around an inch.
The butter you use should be cold because if it melts too soon, your dough wouldn’t be crumbly. If the dough gets super soft for any reason, because the butter you used was on room temperature or melted, then place the dough in the refrigerator for 30 minutes to an hour, till the dough is good enough for you to handle. The heavy cream used in the recipe is an approximate measure. It honestly depends on the flour that you are using. If the dough doesn’t come together easily and if you feel its still dry, add a little more cream, little at a time. Similarly, if the dough is too sticky and gets hard to handle, you can always add a little more flour, one tablespoon at a time. Avoid overworking the dough, because scones do not need too much mixing. Less mixing makes softer scones. The dough should be soft, not sticky.
Scones are best when you serve them fresh out of the oven. If you have extra, its always better to freeze the dough and bale it when you are ready to eat. You can freeze them up to 2 months in an airtight container. When you want to use it, just thaw the dough and use it.
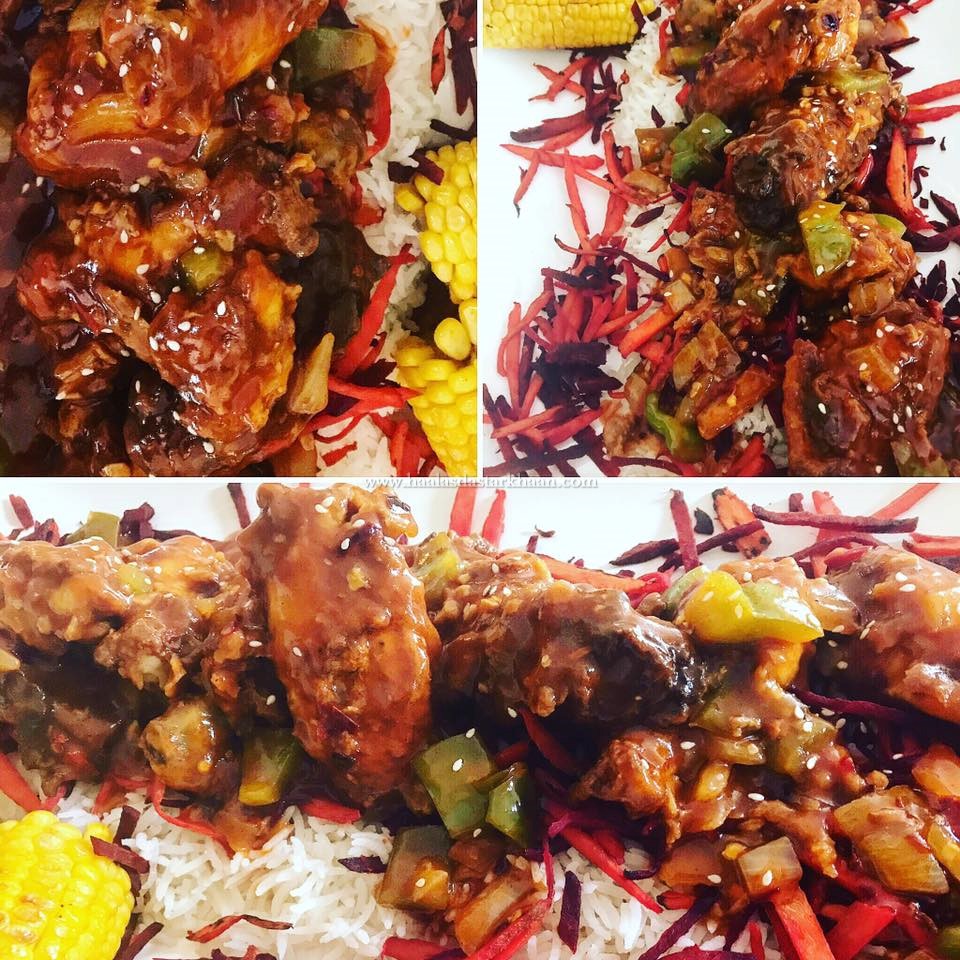
Chicken wings with sauce served on a bed of Rice

Puraani Dilli or Old Delhi is an awesome place for food. I believe being a central place that connects Punjab, U.P., Rajasthan, Bihar and also being close to Kashmir, it has people from all neighboring states. Hence, there is a medley of food. My dad took a lot of trips to Delhi for work. Even we as a family, would be visiting the capital of India quiet often since back in the 80’s and 90’s, we didn’t have the concept of direct trains from one city to another. So, we would take a train to Delhi and then another one to the destination. Since, My maternal family lived in U.K., dropping someone off to Delhi or picking them up from Delhi or we visiting our maternal home was always a trip through Delhi.
Now, being a non vegetarian, purani delhi is the place to
be. Despite the crowd, the pollution and uncountable hygiene issues, every non
veg lover at some point visited “jama masjid area” to satisfy their cravings.
We did that on almost every trip and my father tried it at least twice each
time, if not more. Some very popular restaurants serve awesome and delicious
kebabs and curries with sheermaal, roomali roti and finger licking biryani.
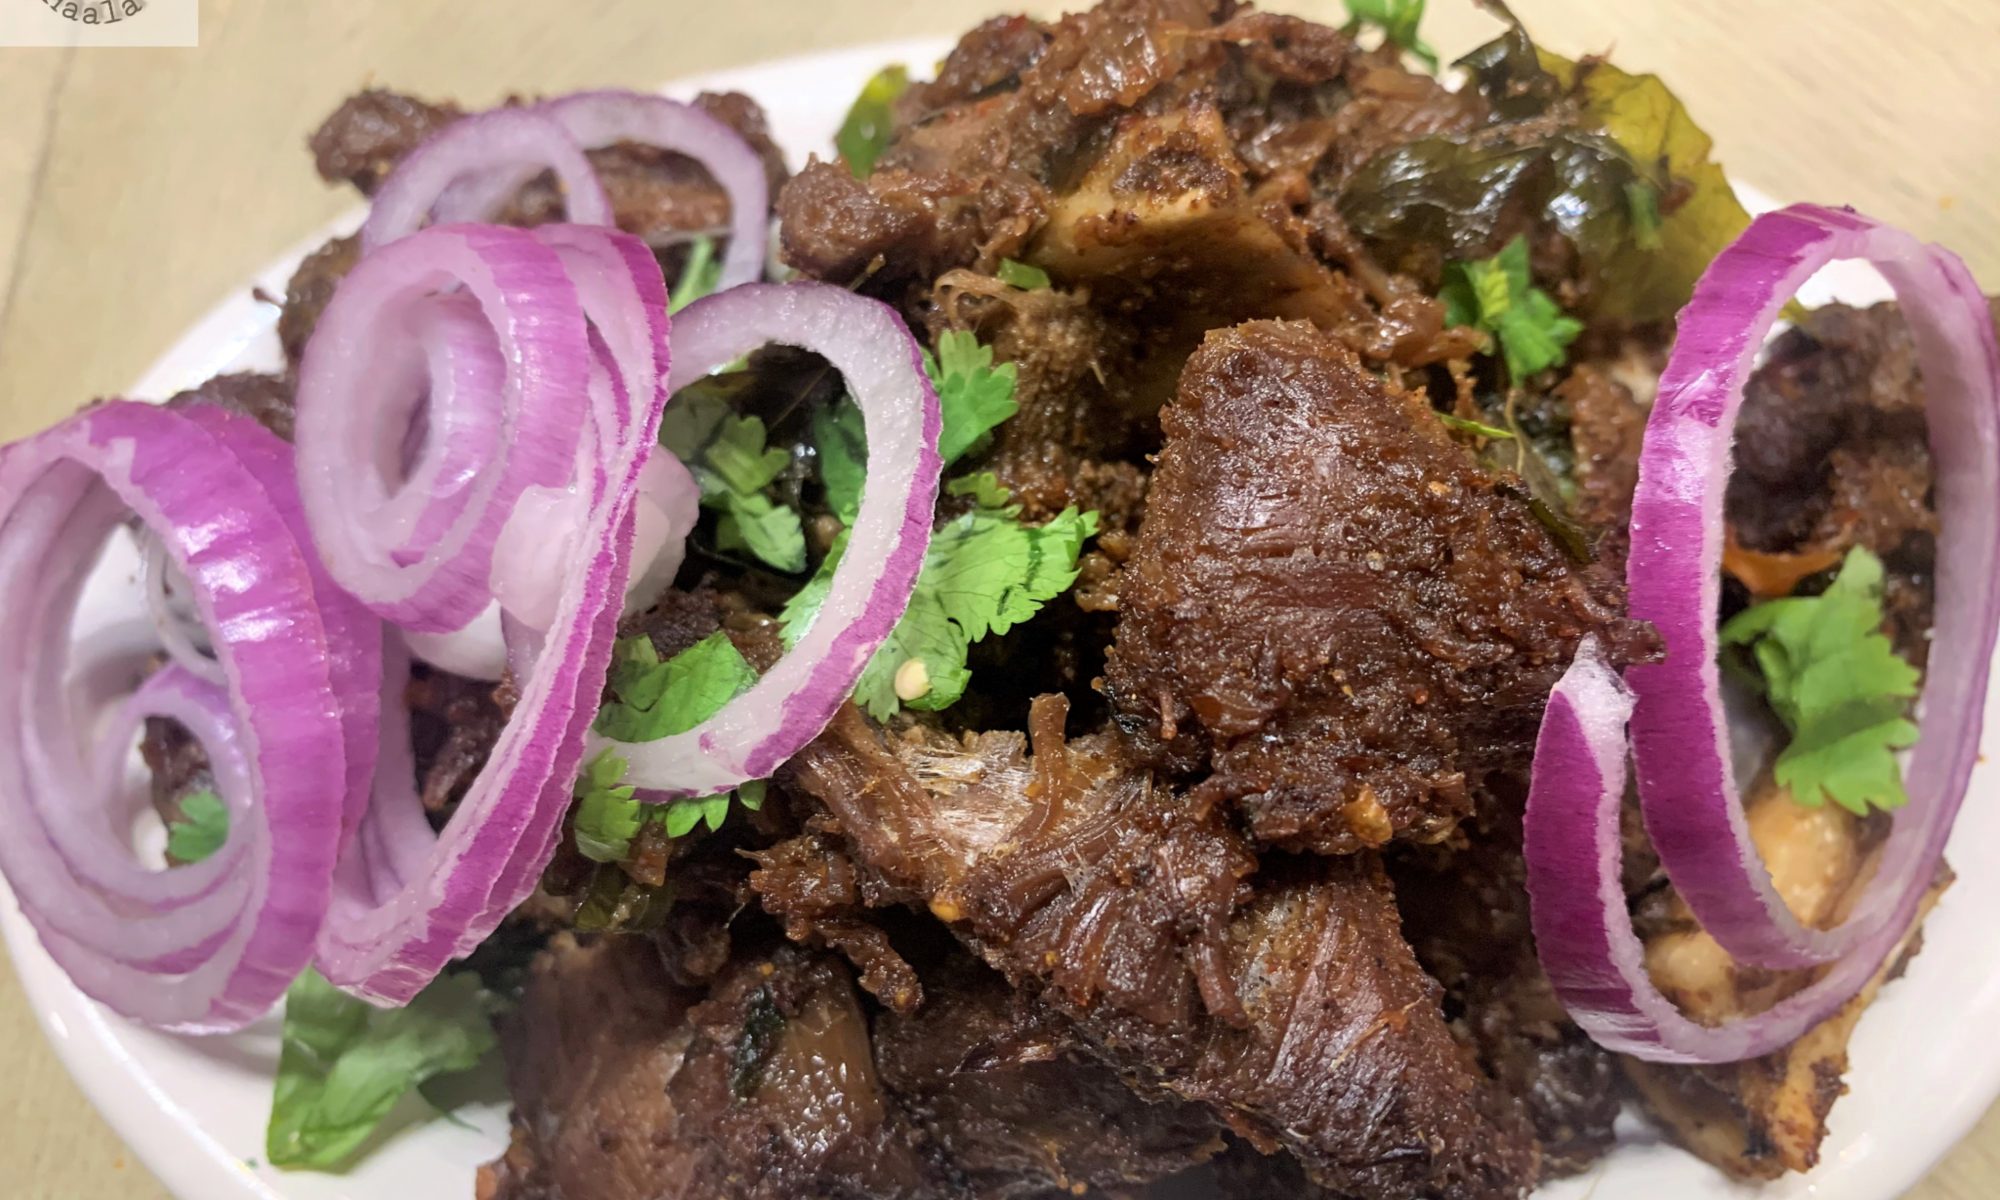
Amongst the various variety of kebabs, Burrah kebabs stole my heart. Made from lamb/Goat meat marinated for a few hours, these kebabs are juicy, crunchy and full of beautiful flavors. So I had to search for the recipe. Though the recipe that I found wasn’t close to what my taste buds witnessed as a kid but being a home chef I knew how to add and deduct things and come out with the exact taste.
Dilli ka Burrah Kebab also has a funny story connected to it. I suffered from Typhoid and I was forced fed all the food without oil or spice for days and when it got over and I fully recovered, the doctor asked me a simple question, “What is the first thing you would like to eat?” and I said, “Burrah Kebab”. Of course the doctor had no clue what a seven year old was saying but my parents couldn’t stop laughing realizing how tortured I was after the sickness.
This is a must try for people who love Mutton kebabs. Pretty easy to make and can be stored too.
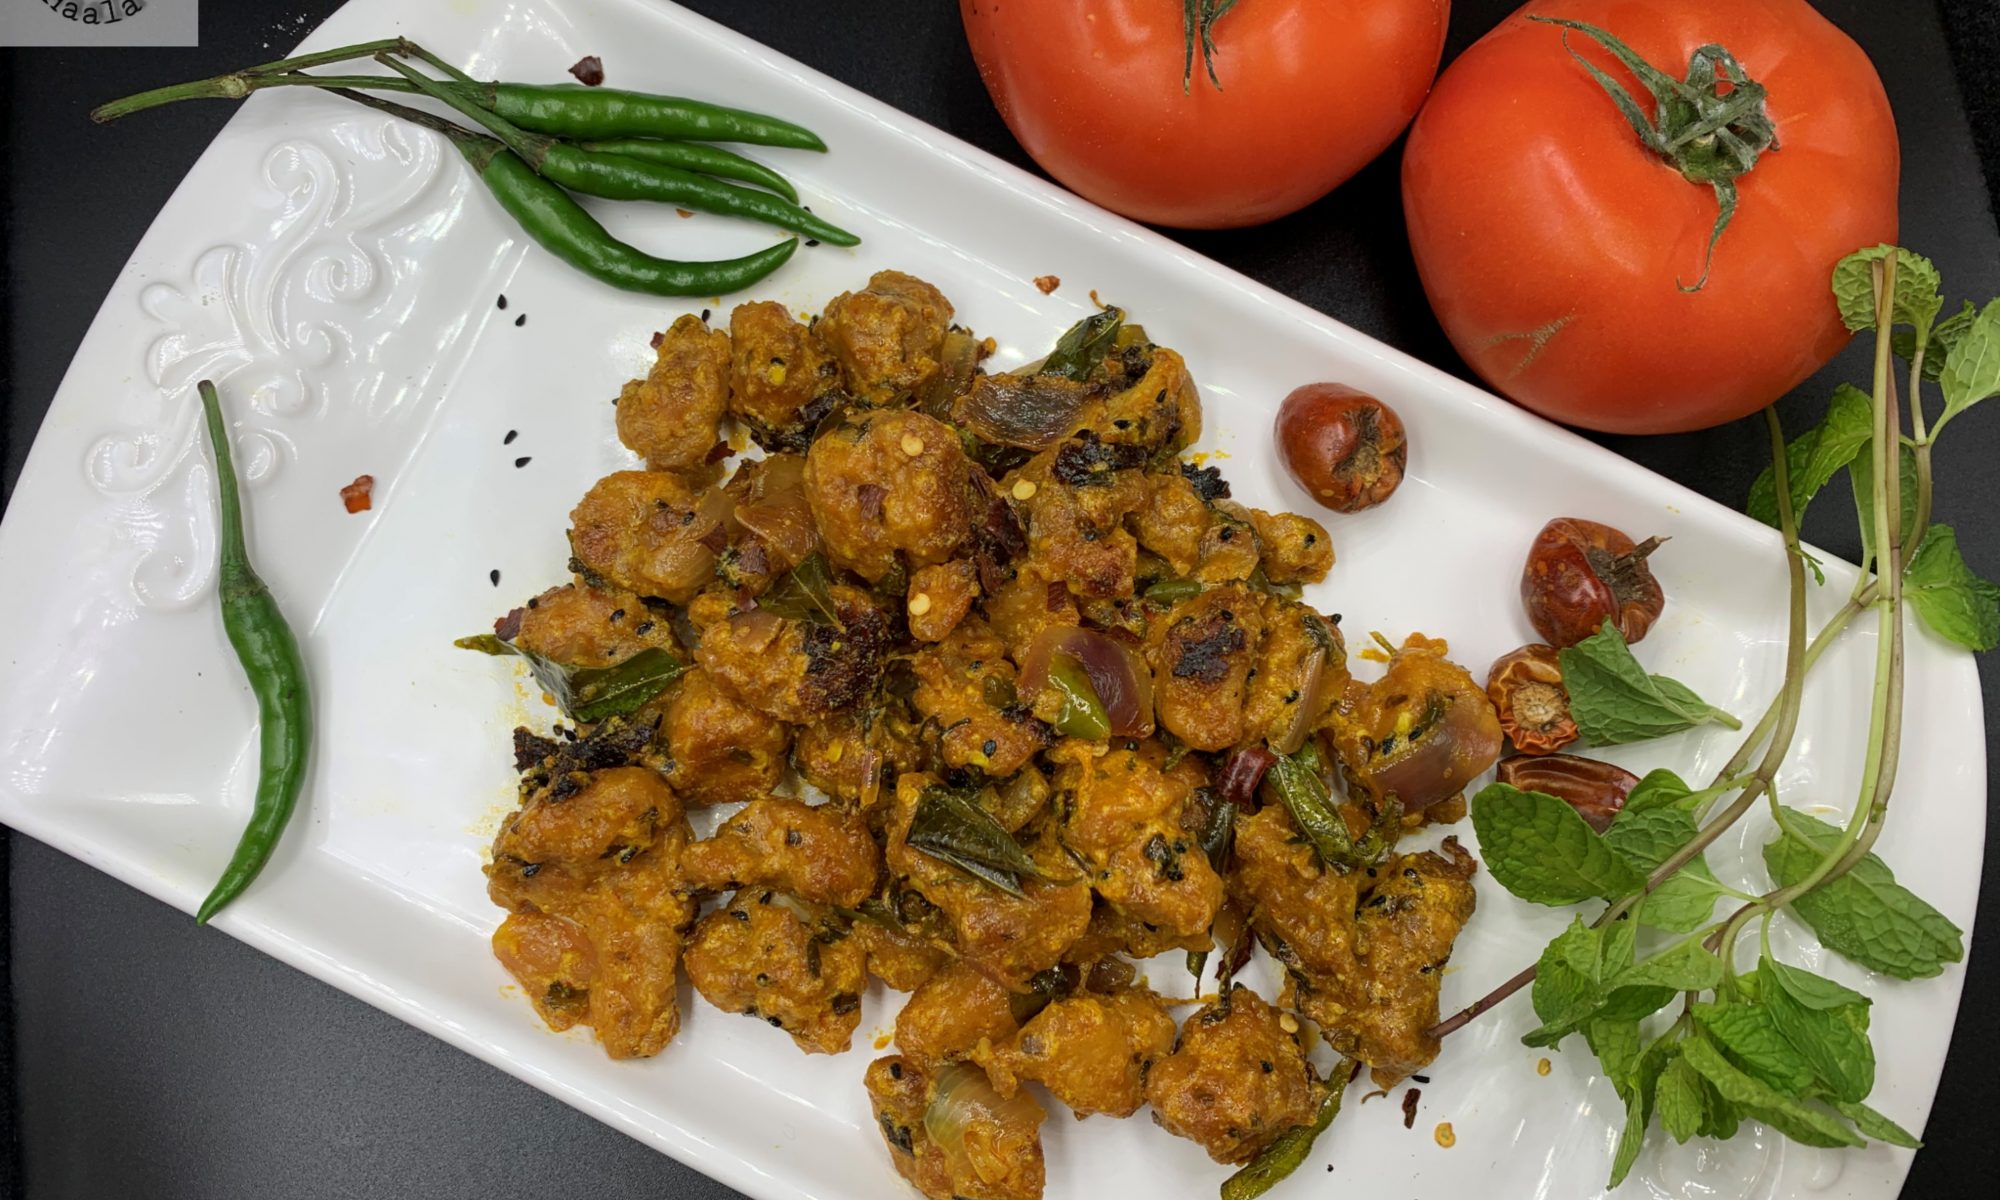
Shrimps are one of my favorite kind of seafood and I would always try shrimps with new kind of gravies or new styles of marinade and fry them or grill them in different ways. Mr. Parveez always preferred eating an actual fish to eating shrimps. He finds Shrimps to be a little tasteless. So, when I started making Shrimp curries, he was still not a big fan. He would eat, but you know not really enjoy it as much as how I would like him to.
We watch a lot of travel shows and during one such show, the host happened to be travelling around restaurants in Kerala and one such restaurant was cooking Malabar shrimp curry. Now before anything let me tell you this. We were watching this program around an hour or so before dinner time. While the chef in the restaurant was showing how he prepares his special Shrimp curry, we were glued to the TV and wished we could see it live in person and have a bite of that scrumptious looking curry. Anyways, just as I mentioned that it was around an hour or so before dinner. Looking at that curry, I was determined that I have to try making it. Funny enough I remembered that my freezer has a pack of frozen shrimps. I always believe in miracles and this might have been one such lucky day. I got down to making it that very moment. The curry came out amazingly delicious and a family favorite too. Now the chef had only given in a rough idea on how to make the curry and few things that I have added to my curry recipe was not a part of the show that we watched. So, you might not find this different from an authentic Malabar Shrimp Curry, but you will definitely get the hint of Malabar flavors and savor each bite.
I deveined the shrimps but left the tail on. I feel it makes the shrimps look prettier in a curry, but you can always take the tail off if you prefer. After washing and pat drying, I marinated the shrimps in Ginger garlic paste, Red chili powder, Fennel seed powder, Tandoori powder, salt and lemon juice for 15-30 minutes. I also added a bunch of curry leaves. Further added some Rice flour, All purpose flour and corn starch powder and deep fried the shrimps. Frying makes the shrimps crunchy and the texture with the curry sauce is very flavorful.
To make the curry, add mustard seeds and fenugreek seeds along with dry round red chilies. Once they splutter, add curry leaves and further add chopped onions. Add ginger garlic paste followed by black pepper powder, Turmeric powder, Red chili powder, coriander powder, fennel seed powder, salt and cumin powder. Add the Dry red chili paste, tomato puree and green chilies along with fried shrimps and dry fenugreek leaves.
This shrimp curry is pretty easy and would make a special place in your menu. Its goes along great with garlic naan or plain naan and also Kerala Parantha.
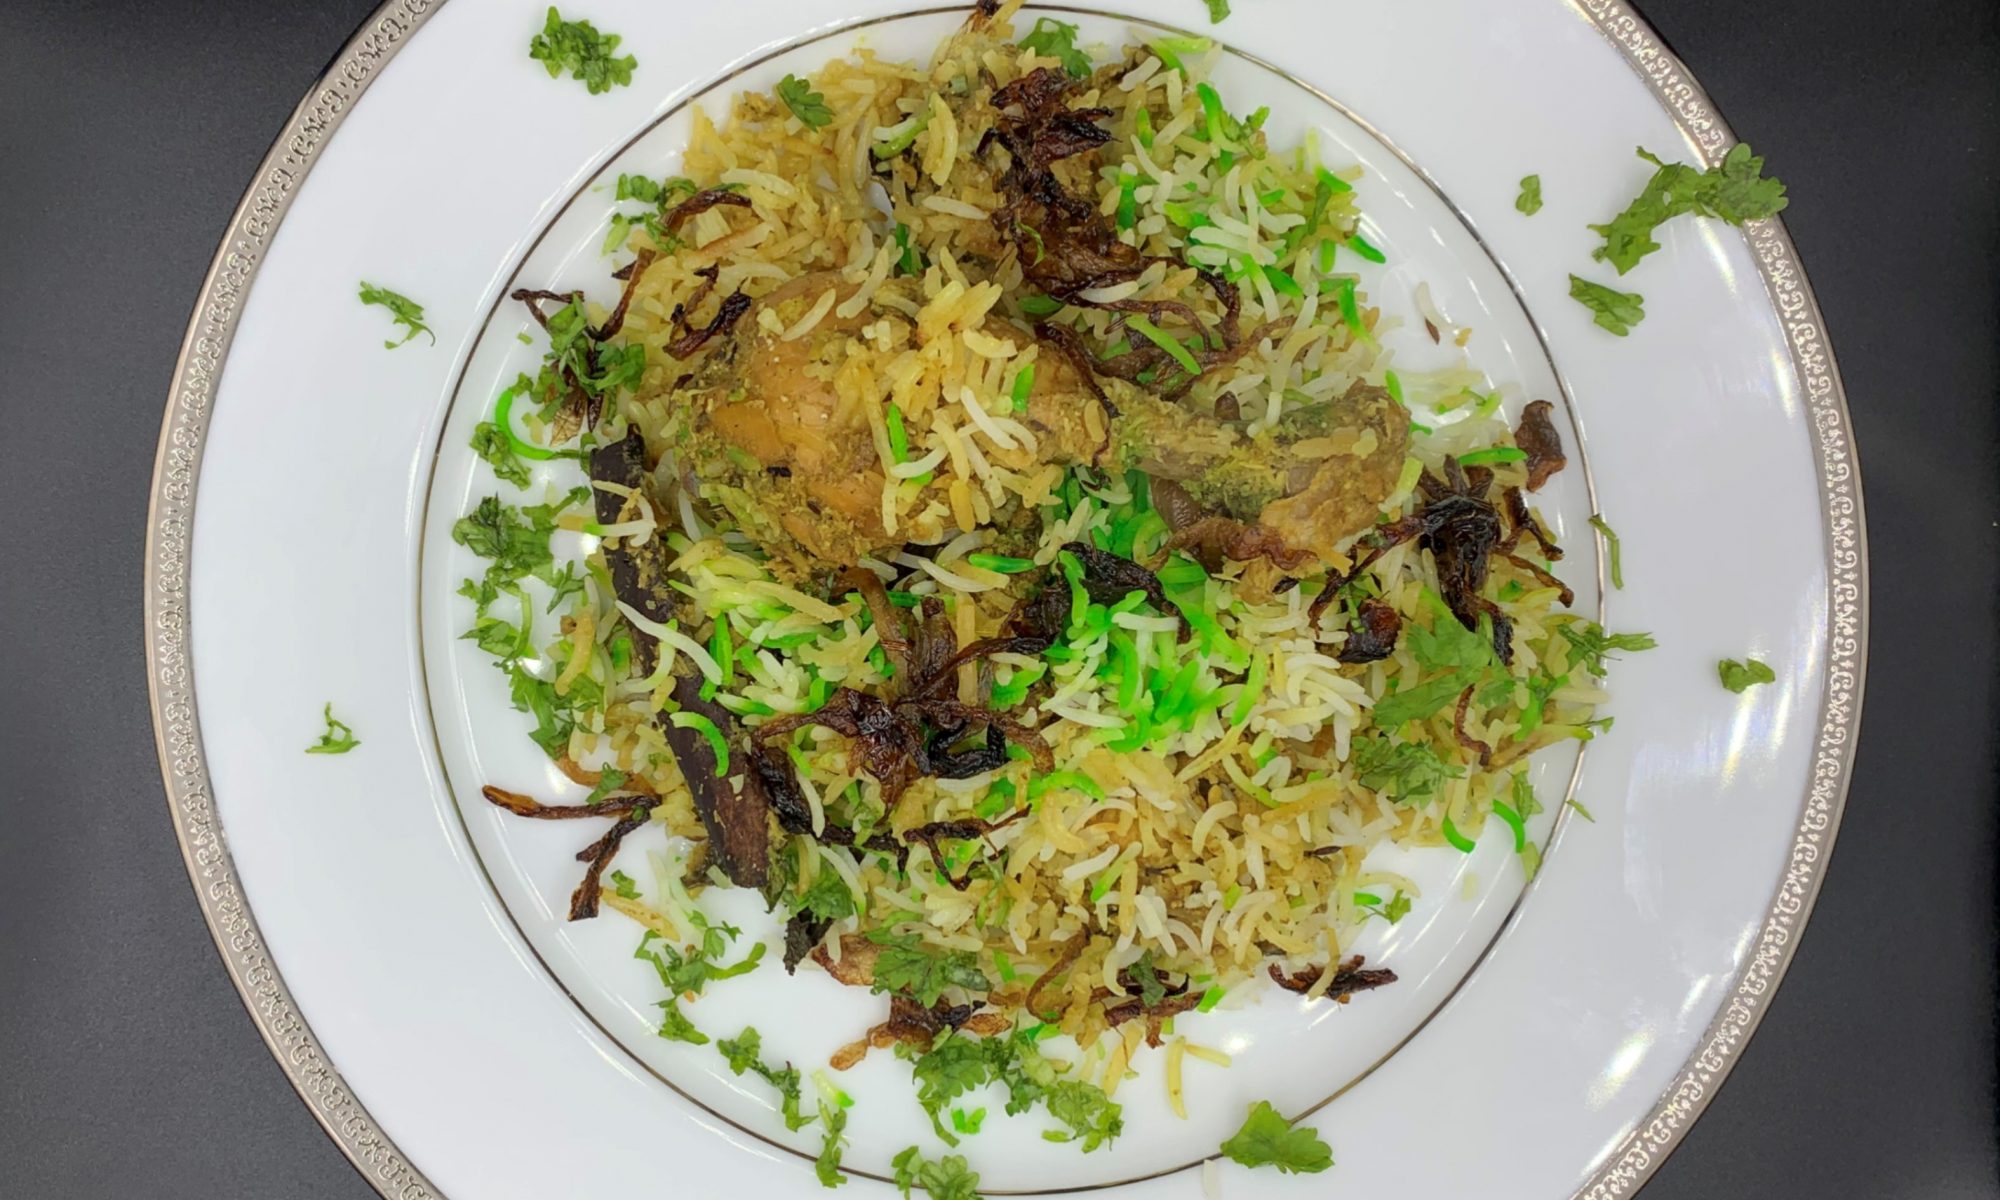
This recipe also happens to be from Kerala and is the second Biryani from this state that I tried out. Kerala is a state of distinct flavor. I know every state has their own flavors that are distinct and are easily distinguishable from the use of their local grown spices with methods of cooking different cuisines and also availability of local vegetation. Not forgetting their natural climate. Isn’t it amazing how every place has different things popular during different seasons and few things that are good to eat during all seasons. Hats off to generations before us who tried, tested and made so many different varieties of food that we just need to follow. And though, it all seems walk in the park, we still do not follow those age old recipes because we find them too time consuming in our busy lives today.
Thalassery town of Northern Kerala has a unique blend Arabian, Persian, Indian and European styles of cooking as a result as its long history as Maritime Trading Post. Tellichery is an anglicized name for Thalassery. The original name of Thalassery has been restored post Independence. Although both refer to the same place, the Tellichery Biryani is different from the Thalassery Biryani. This one is a little simpler version.
This Biryani does not use the Jeerakshala/Kaima Rice like the Thalassery Biryani and should be cooked with Long grain Basmati Rice. This recipe also displays the influence of Mughals in its flavors but seems to be slightly revised. Going through the ingredients, I do not find any ingredient that would distinguish this dish as a dish from Kerela. The recipe makes me feel that its made by some settlers who still did not adapt to the flavors of Kerela cuisine and were still new to incorporating the spice or certain ingredients to the dish. In all, this dish is great for all Biryani lovers, specially for Beginners. Therefore, if you happen to be someone new at making Biryani, this is for you. An easy, delicious and simple way of making a delicious Biryani.
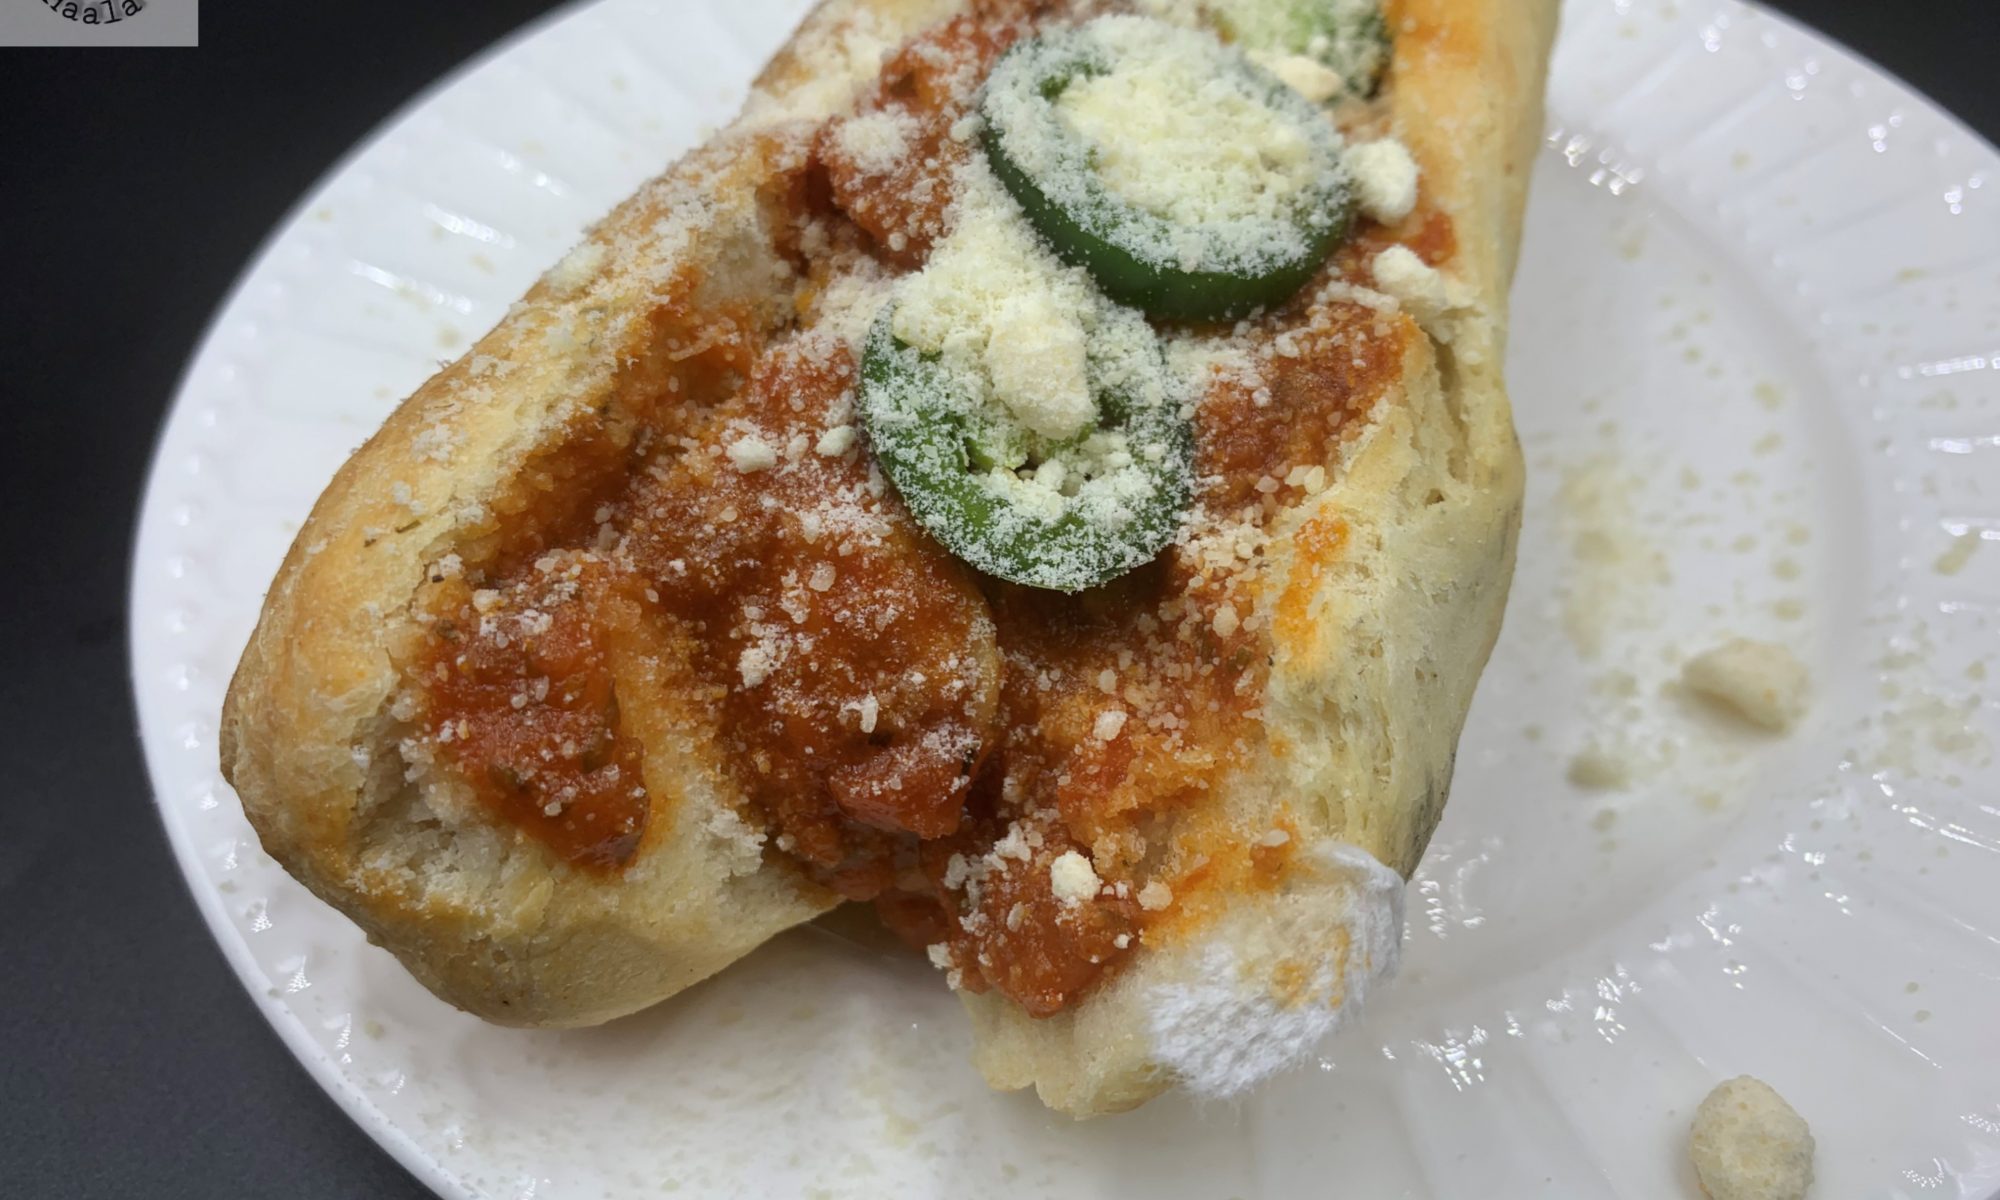
This recipe is a true inspiration from one of our favorite restaurants near our old home. This restaurant is pretty old, owned by a lovely Italian family and has been serving New York style pizza for almost 80 years if not more. A very small restaurant that can barely seat 12 people, but most people order their take outs. We were their regular customers and along with the Pizza, they also served variety of other Italian fast food cuisines. What I loved the most was the Garlic knots and the Shrimp Hero Sandwich. The sandwich was super huge and loaded with wonderful sauce and lots of cheese. The ingredients always tasted so fresh and awesome.
I kind of always love going to these small eateries because one can vouch that they cook fresh because they do run out of things and say “no” too which never happens with big chains. Although, big chains always maintain quality but use large amount of preservatives that keep the food looking good and taste great. Anyways, getting back to my favorite Shrimp sandwich. We moved and its just not possible to go back and forth to that restaurant. So, once I started making my own bread, I also started making baguettes and that led to making these wonderful sandwiches.
My boys love eating bread. Specially if the bread is served straight out of the oven. Baguette, the long delicious French Bread seems to be a family favorite. Every restaurant that served a good bread had us visiting them more often. Every time we bought French Baguette from our favorite baker, I would reheat it in the oven to make it taste fresh, which was great but not the same. And, that’s when I thought I should try making my own baguette at home. Honestly, looking at so many different recipes, I felt that Baguette wasn’t all that fancily difficult and I decided it was time I just make it. I mean, how could anything be better than a freshly baked loaf of bread? That crackly crust, the tender, airy crumb inside, steamy and yeasty and just begging to be torn into.
You can look into my baguette recipe and follow it. It’s a detailed recipe and the instructions are pretty easy to follow and execute. Once your baguette are cool enough to handle, cut them to sandwich size and slit from the middle. To prepare the shrimp, just devein and take the tail off, wash them well too. Fry some garlic in the oil and add marinara sauce. Once it comes to a boil, add shrimps to it. Cook for 2-3 minutes, add Red chili flakes, dry parsley and garlic powder. Cook for a minute and add Onion powder. Cover and cook for 2 minutes. Your marinara sauce should be thick by now and shrimp should also be cooked. Slit the baguette and add the shrimp with sauce. I like mine spicy, so I added Jalapenos as well, but you don’t have to. Place them in the oven at 350F for 5-7 minutes. Sprinkle some dry parmesan cheese and serve.