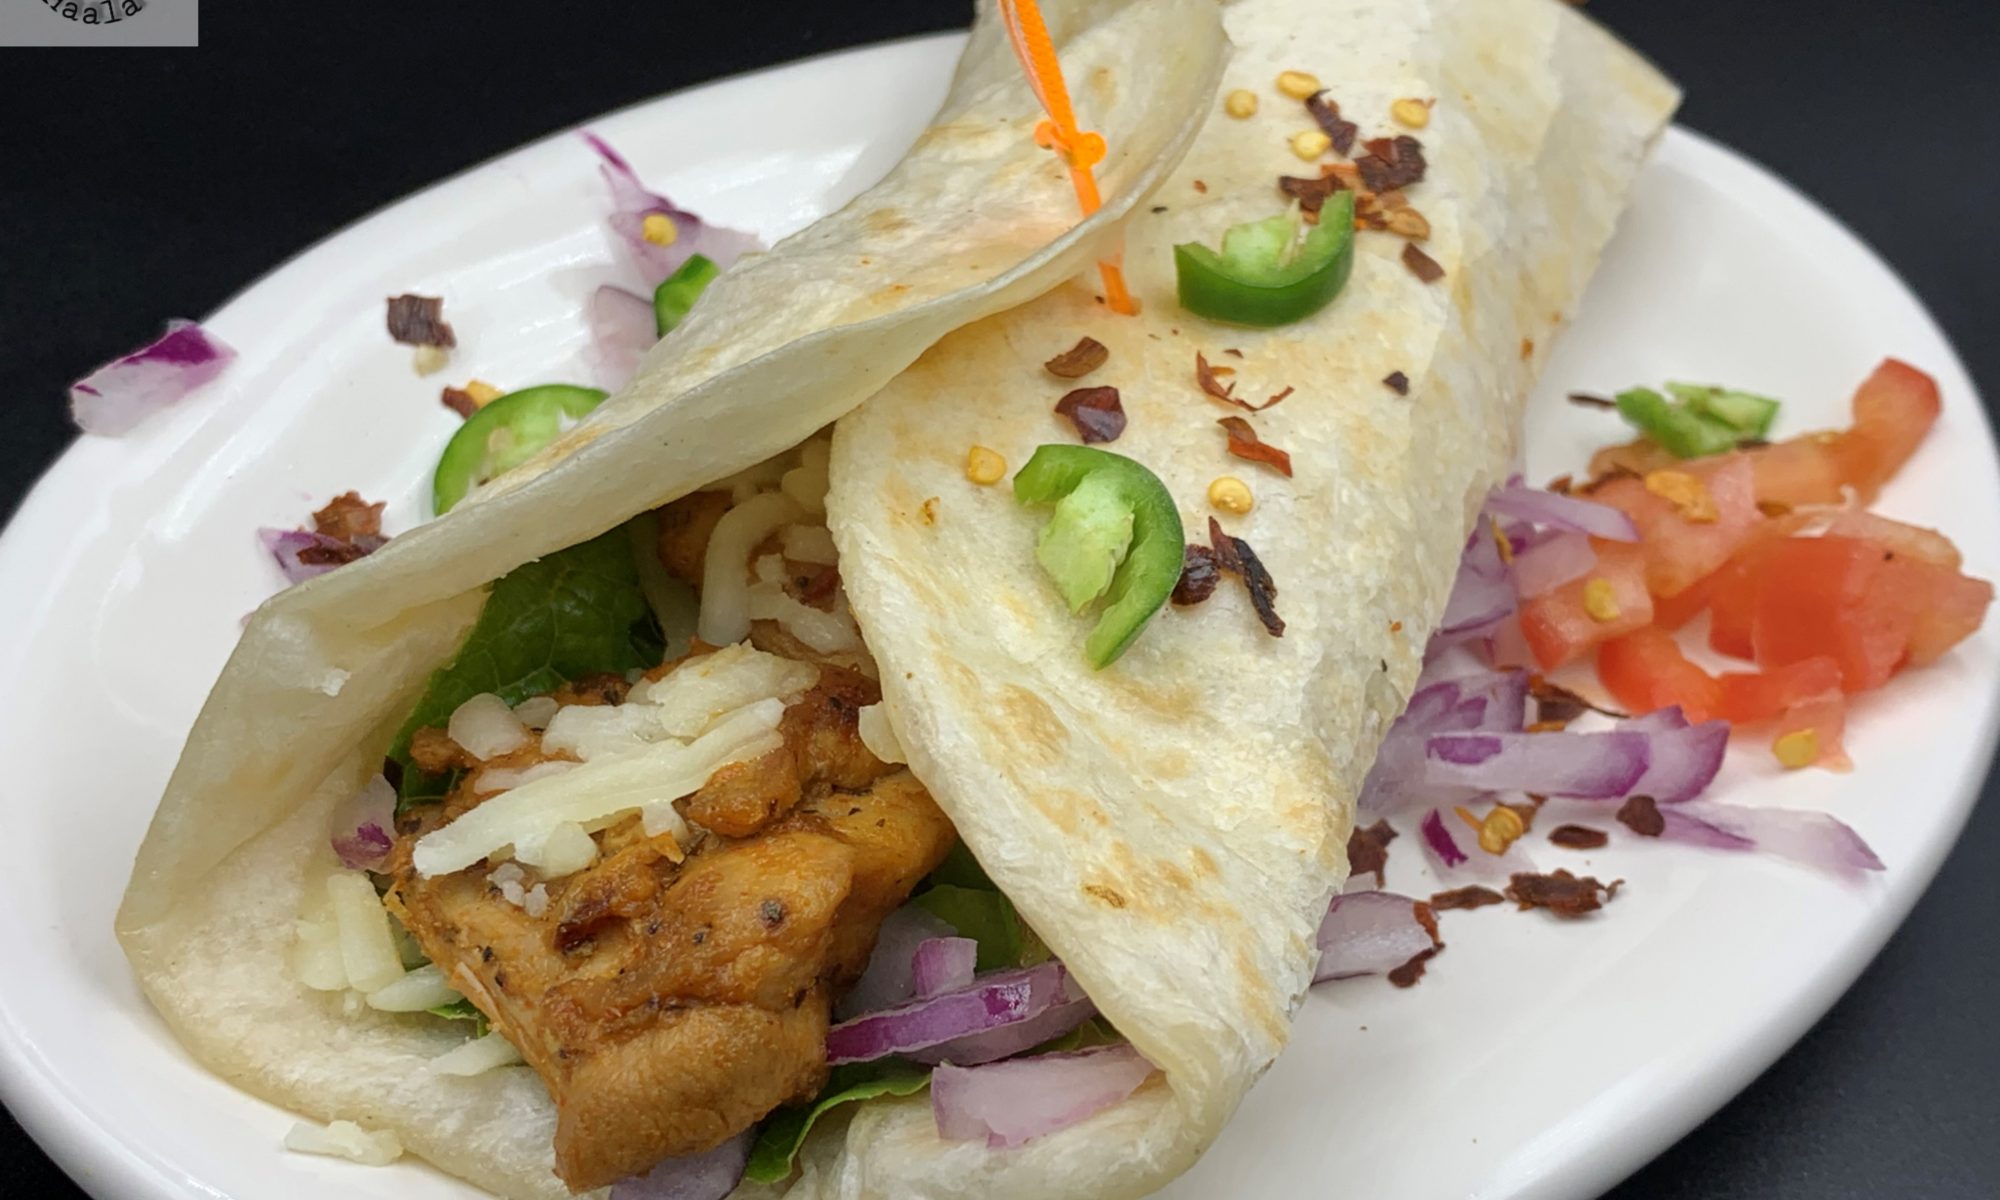
Shikari Chicken Rice

This is an invention by only hearing about the dish…Yeah I know I can go nuts when it comes down to trying to make a new dish. This happens to be one that I really planned out well and craved to make it.

Like I always say, every dish has a story. This one has one too. While speaking to a close friend about different Biryanis that we get at famous and not so famous eateries in India, I was told that a popular restaurant served something that was close to Biryani, but not Biryani. That really got my interest. Giving me further details, that its mildly flavored bed of Rice served under these awesomely juicy grilled chicken. I mean who wouldn’t want to act on this description and try and make it. It’s actually not just the details of the dish, but the way it was described and the fact that it topped the list of Chicken and Rice. I had not even seen the dish, yet I was head over heels in love with the dish and felt challenged to make it.

When you are aware of a dish, you tend to study it by searching about different chefs who have made it or by trying the dish out at different restaurants or even making the dish a couple of times to achieve the desired flavor or result. But when its a dish, you have never heard of until now, tried, seen or tasted, and you crave to cook it, you are definitely a crazy chef…LOLzzz. I think I fit the bill.

So, I am not aware of the Chicken served is with bones or without, but going according to my Biryani basics, I picked Chicken with Bones and marinated the chicken with spices and Yogurt for around 2-3 hours. Though my chicken came out delicious, I still recommend that a chicken is more flavorful if marinated overnight or for at least 6-8 hours, though in today’s time and age, things happen unplanned and we have a little time before we decide what we need to cook. For all those times, marinate, cover, and place the chicken in the refrigerator. Refrigeration helps blend the flavors faster and better. Once I was ready to cook them, I took them out of the refrigerator and preheat the oven to 400F or 180C. I placed them on the grill with a tray underneath to catch the dripping. The cooking time was around 25-30 minutes, with an extra 5 minutes of high heat grill, since I wanted them to look well done. If you want, you can cook them in the oven and do the latter process in a pan, or on naked fire. Any which way will give you great outcomes.

I made a gravy as well to spike up the layers of Rice. The gravy was made very similar to Biryani Yakhni shorba. For initial whole spices, I added fennel seeds along with cinnamon, cloves, green cardamom, and cumin seeds. I further fried the onions, taking half of it out for garnishing and using them while layering the Rice. That was followed by Ginger garlic paste and spice powders. Further adding tomatoes and Yogurt, combined with green chilies, mint leaves, and coriander leaves. I also added the marination left behind after the chicken is taken out, so it gets a little flavor from the chicken as well since we aren’t cooking the chicken in the gravy.

This is a lovely recipe for a weekend Brunch or to display your cooking skills to those uninvited guests, when you don’t want to spend too much time in the kitchen. It’s a pretty quick fix to traditional Biryani and modern-day Chicken over Rice. One of my self invented and the best recipes ever…Enjoy!!!

Methi Chicken Curry

This curry is one of my most initial curries. My love for cooking during my earlier cooking days never had curries on the menu. I have always been more of a Biryani and Kebab person. It was much later that I started making curries and Methi chicken happened to be one of the first ones that I tried following a recipe I read in the book.

Now just to be clear, my mom does not make Methi Chicken, so honestly, I had no idea whatsoever if this dish will even come out and be edible. The dish really surpassed all my expectations and it became a must for special and not so special occasions, but with time, as I improved in my cooking skills, I felt few changes here and there would make it more flavorful.

The initial recipe required only tomatoes for Gravy, which I feel if made a few hours before tends to get a little dry. See, it’s simple logic, protein does tend to absorb moisture in the curry over time, therefore if you make a curry always make slightly saucy. Even with curries that are supposed to be thick in gravy, while making the curry should not be kept too thick, specially if you are cooking a few hours in advance. Once the curry is cooked, or for that matter when you cook any dish, it tends to get thicker as it cools down. Therefore, to make the consistency of the gravy a little thinner, I add Yogurt along with the tomatoes. Secondly, most recipes, actually almost all recipes where I see methi leaves as an ingredient for the dish, the recipes use kasoori Methi and as much as I like the way Kasoori Methi works its magic in curries, it can never beat fresh green Methi leaves. From my point of view, for curries where methi leaves are one of the main ingredients, we should use the fresh ones as opposed to the dry kasoori methi. Curries such as Butter Chicken or Malai Kofta require kasoori methi since its only needed for flavor enhancement and balancing the creamy texture of those curries.

I marinate the chicken in this recipe, for around 15-20 minutes, which is enough time for you to finish chopping the onions and start with the initial process of cooking this curry. A wonderful recipe and one of the best Methi Chicken curry that you can ever have. Enjoy!!!

Chettinad Chicken Curry

A beautiful Chicken recipe that sure opens up all your taste buds in an amazingly flavorful way. This curry is spicy and only for the brave of hearts. Now the spice level can always be turned down by adding less chilies than recommended. You can always make modifications to suit your own palate, but the fact is that this is not the curry where you should really be doing this. It has to be made this way for experiencing the real taste of Chettinad.

This recipe is from the southern state of India, Tamilnadu. Chettinad chicken curry is quite fiery. I have tasted this curry as different restaurants, each different from the other. The curry always managed to win our heart. But I had never thought of making it at home until recently that we tried it as a restaurant in Bangalore, the night before we were traveling back home.

First bite of that curry and I just knew that this was the perfect Chettinad curry ever. the spice level just sent us rocking. I just knew that all the ones before this were so modified and I would highly recommend, please do not do that. This curry is amazing and is one of our family favorite too.

Kaju Chicken Curry

Cashews are my favorite dry fruits. I can eat them raw, fried, baked, salty, sweet. You name it and I can eat it. So, with my love for cashews, I also enjoy their flavor in my curries. Addition of cashews makes the curry milder, thicker and a little sweeter. Its a good substitute to cream as well. I am not a big fan of using cream in my dishes, I mean I do but as little as possible and mostly its for decoration purposes.

So cashews do mostly make the gravy mild and the sauce turns a little more thicker, but the fact is that you can not put in more than 10-12 cashews pieces, soak them and grind them and add them to the gravy. Be it any curry, adding cashews does add a lot of life and adding a little more makes the flavor of cashews more prominent.

This recipe is one of those where I added more than usual cashews and the curry base has a very strong taste of cashews. Other ingredients have also been pureed to add a balance. In usual recipes that I come up with I also suggest substitutes and for this one, if you aren’t a big fan of Cashew or happen to have any allergies, You can follow the recipe the same way with Almonds. The only stipulation is that you need to soak the almonds and take the skin off. The recipe is easy and has been my kids favorite for quiet some time.

Chhole Tikki Chaat

I belong to Rajasthan, the land of flowing ghee, beautiful people and the most colorful state of India. Marwaris love chaats, specially the ones that are fried and warm and trust me, no one can make chaats and sweets better than Marwaris. That’s the reason we always see most sweet vendors and chatwalas as Marwaris.

I have been a big fan of chaats and this happens to be one of my favorites. It takes a little time to make it, but one bite into this awesomely delicious food and all the effort seems totally worth it. This chaat is also close to my heart because this was the first dish that portrayed my culinary skills and he felt proud that he is getting married to a promising cook.

Now, I learnt to make this chaat through a family friend, who would offer to cook food for us every Ramadan. Honestly, that was the first time I realized that such good street food can also be cooked at home as well. I was 11 then, and I would always be a little helper. With time, I learnt how to make it by myself and it always has pleased everyone who tried it.

The tikkis are made with boiled potatoes mixed with spices and rolled in mix of Maida and Corn Starch Powder, before pan frying. The corn starch makes the tikkis super crunchy and that is exactly how you want them to be. Specially once you add on hot chhole, the tikkis can get soggy very quickly. Corn starch helps it stay crunchier for longer.

The chhole have to be spicy and tangy, giving that perfect chaat taste to the tikki chhole. Adding Tamarind and dry pomegranate powder to chhole makes it taste just like the street foods in India. I usually soak my chickepeas, boil them and once cooled down, I pack them in separate ziploc bags and freeze them. I like to make loads of chaats that include chickpeas and this is one of my favorites. So, not having chickpeas, since they need to be soaked overnight, is the last thing I need to worry about if I feel like making chaat.

Assembling this chaat is what makes it taste more delicious. You can make the best Tikkis and chhole, but if you don’t assemble the chaat the right way, it wouldn’t give you flavors you are looking for. It has to be served warm on top of potato tikki and further garnished with chopped onions, coriander leaves, Tamarind date chutney, Green chutney and thin sev.

Hyderabadi Chooza Curry

This is a Chicken curry influenced from the era of Hyderabadi Nizams. I came across this while reading a book on Hyderabadi Nizams which mentioned how their culture, tradition and also the food was so much similar to the Mughals.

The reason why this dish is called a “Chooza” curry and not a “chicken” curry is because in those days curries were made out of baby Rooster’s meat, which was called Murgha or Chooza, it had more meat. Chicken on the other hand was “Desi Murghi”, it was more of bones and less meat and it was mostly used for making Biryani. So, this curry was made with the meaty chicken, hence “Chooza curry”.

The Hyderabadi Nizams were known for their rich choice of jewels, clothes, decorations and food. Even now, if you ever happen to eat Hyderabadi food, you can taste the richness of Ghee, Butter, Cream, Dry fruits and Khoya. Most dishes always have coconut as one of the ingredients as well, which also adds a lot of richness and creaminess. I have always enjoyed cooking Hyderabadi cuisine. I love the use of whole spices in dishes and Hyderabadi cuisine uses so much variety of them that as a cook it makes you feel really good, working with so many different spices and experiencing the fragrance while you cook.

This dish can surely please your guests and its a perfect dish for grand dinners and special occasions. Goes well with parantha or Sheermal.

Hare Chane aur Kheema

Goat Kheema is a popular dish in Muslim families, often served for breakfast. When talking of Kheema, did you know that Kheema is not only made differently in India from Pakistan or Bangladesh but its made differently in different regions of India.

The north part of India makes Kheema with Cauliflower and serve it with Naan, East side makes theirs with Potato and serves them with Parantha, Delhi loves making it plain and also serves it with Tandoori Roti, West loves it Peas, Mumbai has it completely distinct and serves it with paav and down south they add methi [fenugreek leaves] and dill leaves to Kheema and serve it with Kerala Parantha. All the varieties are different and awesomely delicious and its hard to pick one over another.

The word ‘Kheema’ is inspired from the Persian language, in which minced meat is referred as, “Kiyma”. Kheema was a popular breakfast staple in the Mughal cuisine and the history says that it was introduced in the Indian cuisine by Mughal Emperor Akbar, who was so fond of new recipes and would love the merge of Persian and Indian recipes. It was an age when the royal families took their culinary affairs almost as seriously as their administration.

Being from the Rajasthan, I have always loved the Kheema curry in Mumbai and Delhi. Nahari and Kheema in Delhi used to be my favorite breakfast. My mom always made Goat Kheema with peas, and it used be one of the dishes that she would always make for picnics or day trips and the best part was that we enjoyed and relished them with Bread as well. My Mother in law also adds Lima Beans to Kheema and I loved that addition to kheema.

Then one day on my visit to our local Indian store I found fresh Green chana. They looked so fresh and I bought them thinking I would like to make something out of it. I asked Mr. Parveez and he then asked me to try adding them to Kheema and I did and the result was fabulous. I like making my Kheema with Boneless meat, but you can always get the minced meat from a meat store. Similarly, if you can’t find Fresh Hare Chane, you can always use frozen ones. Kheema curry in any which way, made with this recipe will always come out delicious.

The recipe is great and you can serve it with Naan, Parantha and even buns.

Chicken Tandoori Flat Bread

Who doesn’t love Pizza? We all have a heart that has a special place for Pizza, no matter the changes it brings to the scale…LOLzzz. Flat breads are the new in thing, more like thin slices of thin crust pizza. I kind of prefer it to the regular pizza, since flat breads generally are lighter in cheese and usually a little extra sauce which to me is always a little better. Flat breads usually also have a little sprinkled dry Parmesan cheese on it and it makes it look different from pizza and if you are not a very big cheese fan like me, you will definitely like the taste of dry cheese powder. Sprinkling a little dry oregano or chili flakes also enhances the flavor.

Now coming back to this experiment, we love tandoori chicken and I always try to make my pizza with an Indian touch. There is always so many real flavors of pizza and flat breads available at restaurant and I think if you try and make the same thing at home, it beats the purpose of us going out to eat. So, when trying something at home, I always try to make it different from what we get outside. It could be a little different or more different depending on what you are making, but if its made at home try to add your flavor to make it unique.

So, to make this recipe, you will need around 2 cups of tandoori chicken. I made mine fresh, but leftovers from dinner should also be fine. You can always feel free to make tandoori chicken any style you like or can follow my Chicken Tandoori recipe.

This flat bread can have Paneer or Tofu as well, if you want to have it as a vegetarian option. You can always marinate them with tandoori flavors and make it the same way.

Chicken Piccata

Chicken Piccata is a popular Italian dish, that is sliced, dredged in flour, then sauteed in a sauce containing lemon juice, butter, and capers. We always wanted to try the dish because it looked so delicious with the clear butter sauce and capers, but since Italian restaurants here do not make it halal, we could never try it.

The sauce is basically made using the leftover oil/butter used to cooking the chicken. You can always be a little more creative and add some lemon juice and red chili flakes with/or chicken stock can be added . You can always add chopped onions, shallots and chopped garlic too. 

Serve with chopped parsley and slices of lemon. After reduction, butter/oil is stirred and can be drizzled over the chicken, along with the capers. Its an excellent dish for a small lunch where you have to rush. Since the dish doesn’t need any marination, it comes from pan to plate in minutes and is different variety compared to the regular Italian dishes, which require time and tomatoes.

This dish is great for beginners and the way you plate it with capers with the exterior crunch and soft chicken inside makes it easy to impress your guests.

Burrah Kebab

My dad took a lot of trips to Delhi for work. Even we as a family, would be visiting the capital of India quiet often since back in the 80’s and 90’s, we didn’t have the concept of direct trains from one city to another. So, we would take a train to Delhi and then another one to the destination. Since, My maternal family lived in U.K., dropping someone off to Delhi or picking them up from Delhi or we visiting our maternal home was always a trip through Delhi.

Now, being a non vegetarian, purani delhi is the place to be. Despite the crowd, the pollution and uncountable hygiene issues, every non veg lover at some point visited “jama masjid area” to satisfy their cravings. We did that on almost every trip and my father tried it at least twice each time, if not more. Some very popular restaurants serve awesome and delicious kebabs and curries with sheermaal, roomali roti and finger licking biryani.

Amongst the various variety of kebabs, Burrah kebabs stole my heart. Made from lamb marinated for a few hours, these kebabs are juicy, crunchy and full of beautiful flavors. So I had to search for the recipe. Though the recipe that I found wasn’t close to what my taste buds witnessed as a kid but being a home chef I knew how to add and deduct things and come out with the exact taste.

This is a must try for people who love lamb kebabs. Pretty easy to make and can be stored too.