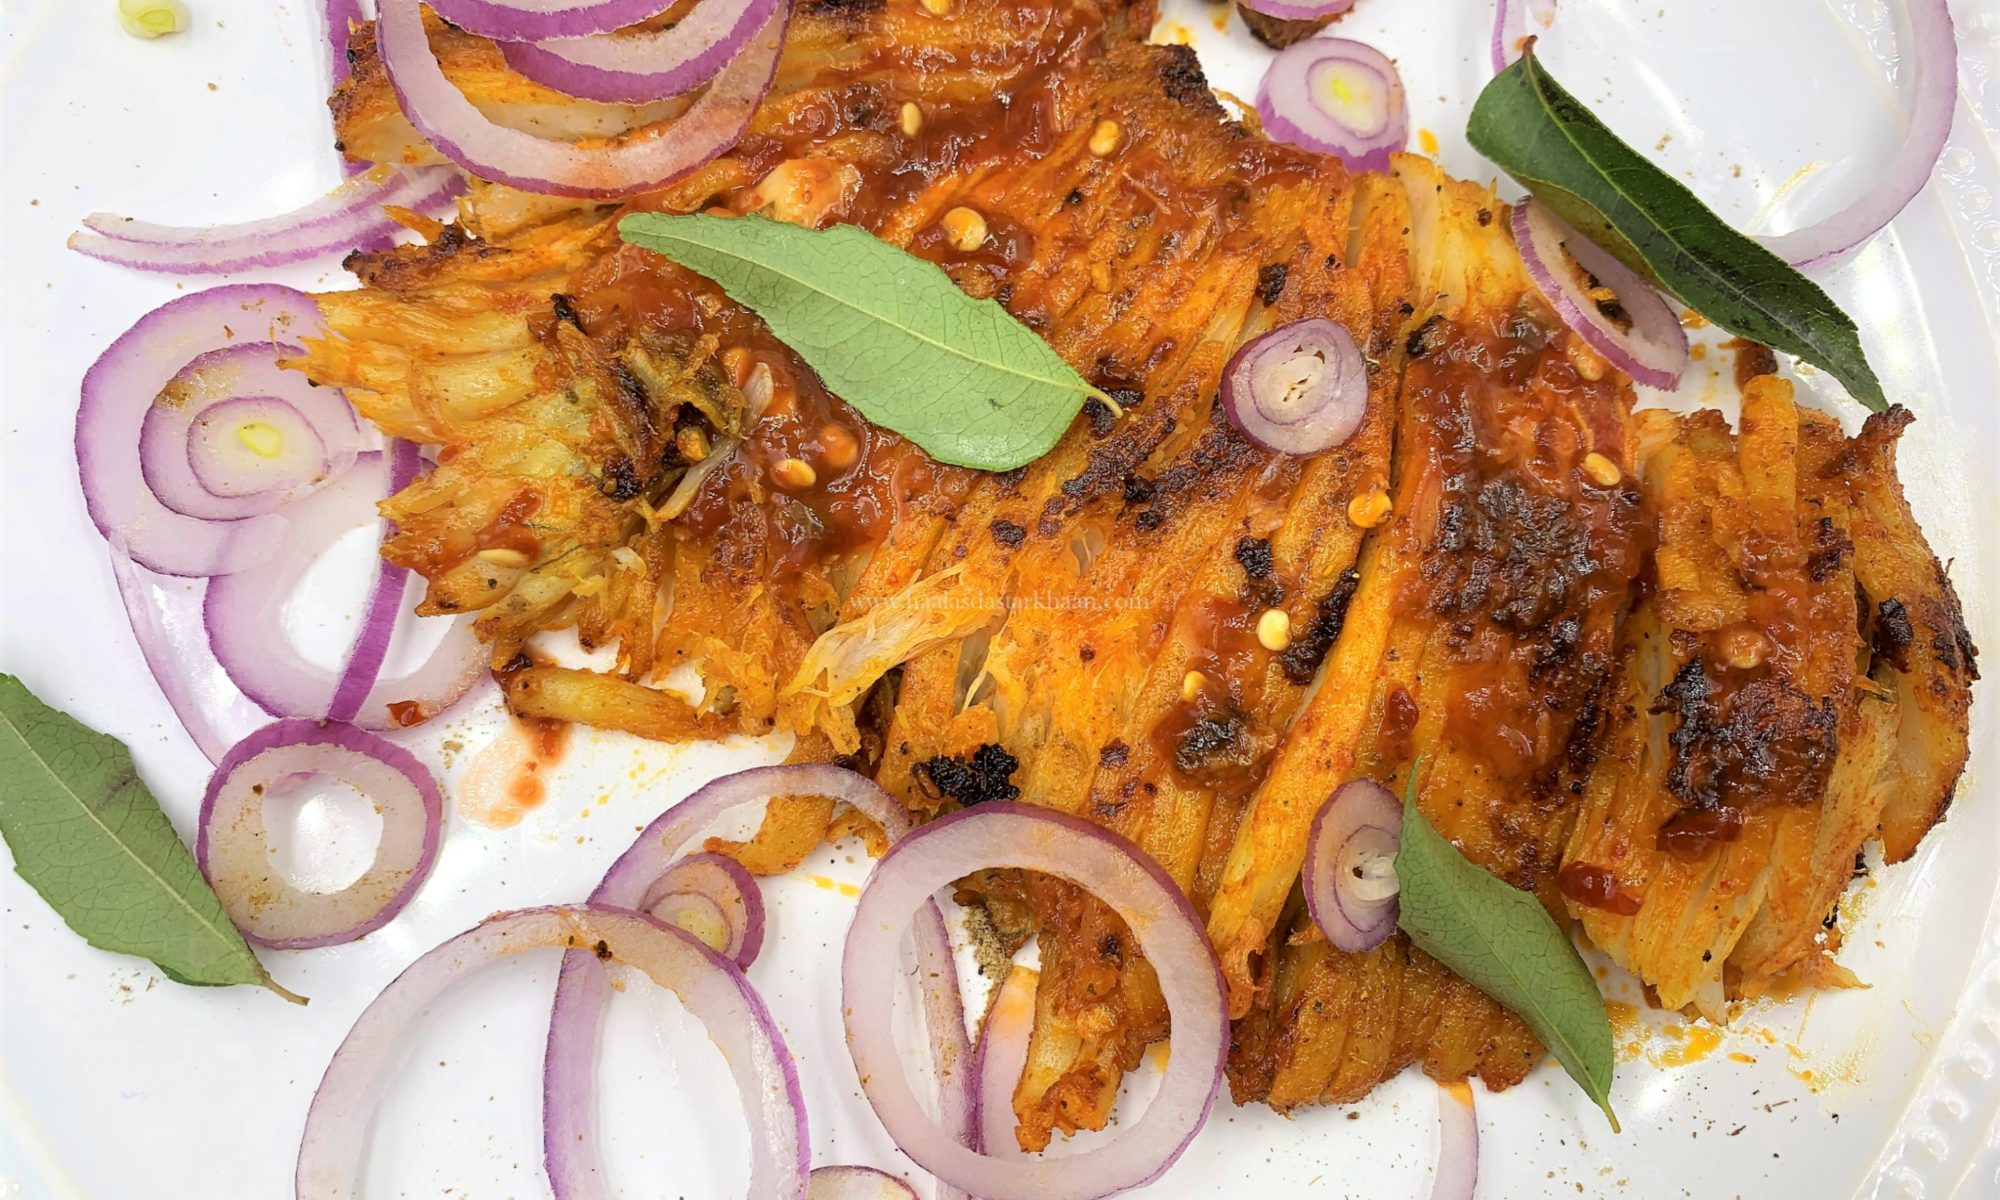
Malabar Shrimp Curry

Shrimps are one of my favorite kind of seafood and I would always try shrimps with new kind of gravies or new styles of marinade and fry them or grill them in different ways. Mr. Parveez always preferred eating an actual fish to eating shrimps. He finds Shrimps to be a little tasteless. So, when I started making Shrimp curries, he was still not a big fan. He would eat, but you know not really enjoy it as much as how I would like him to.

We watch a lot of travel shows and during one such show, the host happened to be travelling around restaurants in Kerala and one such restaurant was cooking Malabar shrimp curry. Now before anything let me tell you this. We were watching this program around an hour or so before dinner time. While the chef in the restaurant was showing how he prepares his special Shrimp curry, we were glued to the TV and wished we could see it live in person and have a bite of that scrumptious looking curry. Anyways, just as I mentioned that it was around an hour or so before dinner. Looking at that curry, I was determined that I have to try making it. Funny enough I remembered that my freezer has a pack of frozen shrimps. I always believe in miracles and this might have been one such lucky day. I got down to making it that very moment. The curry came out amazingly delicious and a family favorite too. Now the chef had only given in a rough idea on how to make the curry and few things that I have added to my curry recipe was not a part of the show that we watched. So, you might not find this different from an authentic Malabar Shrimp Curry, but you will definitely get the hint of Malabar flavors and savor each bite.

I deveined the shrimps but left the tail on. I feel it makes the shrimps look prettier in a curry, but you can always take the tail off if you prefer. After washing and pat drying, I marinated the shrimps in Ginger garlic paste, Red chili powder, Fennel seed powder, Tandoori powder, salt and lemon juice for 15-30 minutes. I also added a bunch of curry leaves. Further added some Rice flour, All purpose flour and corn starch powder and deep fried the shrimps. Frying makes the shrimps crunchy and the texture with the curry sauce is very flavorful.

To make the curry, add mustard seeds and fenugreek seeds along with dry round red chilies. Once they splutter, add curry leaves and further add chopped onions. Add ginger garlic paste followed by black pepper powder, Turmeric powder, Red chili powder, coriander powder, fennel seed powder, salt and cumin powder. Add the Dry red chili paste, tomato puree and green chilies along with fried shrimps and dry fenugreek leaves.

This shrimp curry is pretty easy and would make a special place in your menu. Its goes along great with garlic naan or plain naan and also Kerala Parantha.

Pindi Chhole

This hearty, healthy and delicious dish is from Punjab, India. I initially thought that the name comes from the word Pind used for village in Punjabi. But, actually the name of the dish is from the place it was originated from. It is named Pindi Chana after the town Rawalpindi, which used to be a part of Punjab before India-Pakistan partition and later became a part of Pakistan. Pindi chhole is a recipe from Rawalpindi and now is proudly cooked everywhere and popularly known as Pindi Chhole.

This recipe is easy to cook, it makes for a wholesome meal when served with poori or Kulcha or Naan and an onion salad. Pindi Chana can be made with dried chickpeas, which needs to be soaked overnight and boiled until soft. The recipe also requires the use of chana daal along with chickpeas. I usually soak a large amount of chickpeas and boil them as well. I usually then divide them into smaller packs and keep them in the freezer for future use.

I never realized till I was much older that there were so many different ways of making chhole. I felt every family had there own version of making chhole, like with my Punjabi friends, their moms made chhole that didn’t have a lot of gravy and usually were a little dark in color and didn’t have too many tomatoes either. Where as, my mom always had her own version of making chhole with yogurt. The chhole recipe I follow is from a family friend and I make my chhole using tamarind, tomatoes and fennel seeds. And, then one day I came across Pindi chhole made by a close family friend and loved the flavors. This is when I found out that in most Punjabi families, people tend to boil chhole with whole spices and tea leaves which tends to darken the color of the chhole. Punjabi food anyways uses a lot of whole spice in their dishes and there always seems to be a very strong taste of cloves and cinnamon in their cuisine.

All in all this is one awesome chhole recipe. It goes really well with poori or parantha or kulcha. I serve them for breakfast usually with sooji ka halwa on the side, but that can always be when you have friends over or if its a special occasion, but these chhole with poori can definitely make it to your weekend brunch table. Enjoy!!!

Hyderabadi Lukhmi

Hyderabad is also popular for its Biryani and Khubani ka Meetha. Along with that, there are loads of other popular Muslim dishes that are very popular in Hyderabad but probably not that popular outside Hyderabad. One of those dishes is Lukhmi. It is a typical rectangle/square samosa kind, which has a filling of mince meat or Chicken. Its regarded as savory or starter of the cuisine of Hyderabad. It is a local variation of samosa.

I though have never visited Hyderabad, but I do want to visit it one day. 2 simple reason to it, one of course is Hyderabadi cuisine and second is the Falaknuma Palace that simply became more popular after my favorite Bollywood actor’s sister got married there…LOLzzz. I know sounds crazy, but speaking my heart out is what I do on my blog and it is what it is. So, going through popular Hyderabadi cuisine is when I came across Lukhmi and that’s when I decided to make it. My boys who are big fans of Samosas, I was kind of unsure if they’d enjoy Lukhmi. Honestly, since none of us had ever tried it before, I wasn’t even sure how it will turn out to be. But, to my amazement, not only did they love it, they went a step further by asking me to make this more than samosas, which honestly is a shock to me because my kids can kill for my chicken samosas…Okay!! May be not kill, but definitely injure someone enough if anyone dares to even look at their samosa, forget eating…LOLzzz.

Hyderabadi cuisine has a variety of scrumptious snacks, and Lukhmi, the flaky savory stuffed with spicy minced meat/chicken is definitely one of them. A popular starter at Hyderabadi marriages, this dish also works well for a quick pair for teatime with family or friends. The name lukhmi originates from the word luqma, which means a small bite in Urdu. Unlike the samosa, lukhmi is usually a flat square/Rectangle shaped flour parcel with a flaky and crisp upper crust and stuffed with beef, chicken or mutton-based filling. You have the snack in other shapes like triangles in some cafes and a vegetarian version mostly  with potato filling is also available.

It is usually served with chopped onions and green chilies or chutney. To prepare lukhmi, all purpose flour/ Maida is kneaded with milk, butter and a little water. The mince or vegetarian filling is cooked separately, with turmeric, onions, ginger, garlic and spices. After resting, the dough is rolled out into a huge rectangular roti. More butter is added in between rolling the Roti and refrigerating it for 20 minutes or a little more. This process is repeated 3-4 times in order to create more flakes or layers to the Lukhmi. After the final process, the Roti is cut to multiple squares. Finally, these multiple small squares each housing a filling pocket forming a Lukhmi.

The edges are closed by pressing them often with a fork, and the stuffed parcel is deep fried in oil. As the color of the patty changes to golden while frying, the lukhmi is ready for consumption. The snack had lost some of its popularity over several decades, as many places in the old city stopped serving it. However, it has made a comeback of sorts in the last few years with an increased interest in lost Hyderabadi recipes.

I really enjoyed making these beautiful and scrumptious pockets of goodness and these are now a family favorite for me. I hope you like them too. If you need help with variations, please feel free to ask. Enjoy!!!

Shikari Chicken Rice

This is an invention by only hearing about the dish…Yeah I know I can go nuts when it comes down to trying to make a new dish. This happens to be one that I really planned out well and craved to make it.

Like I always say, every dish has a story. This one has one too. While speaking to a close friend about different Biryanis that we get at famous and not so famous eateries in India, I was told that a popular restaurant served something that was close to Biryani, but not Biryani. That really got my interest. Giving me further details, that its mildly flavored bed of Rice served under these awesomely juicy grilled chicken. I mean who wouldn’t want to act on this description and try and make it. It’s actually not just the details of the dish, but the way it was described and the fact that it topped the list of Chicken and Rice. I had not even seen the dish, yet I was head over heels in love with the dish and felt challenged to make it.

When you are aware of a dish, you tend to study it by searching about different chefs who have made it or by trying the dish out at different restaurants or even making the dish a couple of times to achieve the desired flavor or result. But when its a dish, you have never heard of until now, tried, seen or tasted, and you crave to cook it, you are definitely a crazy chef…LOLzzz. I think I fit the bill.

So, I am not aware of the Chicken served is with bones or without, but going according to my Biryani basics, I picked Chicken with Bones and marinated the chicken with spices and Yogurt for around 2-3 hours. Though my chicken came out delicious, I still recommend that a chicken is more flavorful if marinated overnight or for at least 6-8 hours, though in today’s time and age, things happen unplanned and we have a little time before we decide what we need to cook. For all those times, marinate, cover, and place the chicken in the refrigerator. Refrigeration helps blend the flavors faster and better. Once I was ready to cook them, I took them out of the refrigerator and preheat the oven to 400F or 180C. I placed them on the grill with a tray underneath to catch the dripping. The cooking time was around 25-30 minutes, with an extra 5 minutes of high heat grill, since I wanted them to look well done. If you want, you can cook them in the oven and do the latter process in a pan, or on naked fire. Any which way will give you great outcomes.

I made a gravy as well to spike up the layers of Rice. The gravy was made very similar to Biryani Yakhni shorba. For initial whole spices, I added fennel seeds along with cinnamon, cloves, green cardamom, and cumin seeds. I further fried the onions, taking half of it out for garnishing and using them while layering the Rice. That was followed by Ginger garlic paste and spice powders. Further adding tomatoes and Yogurt, combined with green chilies, mint leaves, and coriander leaves. I also added the marination left behind after the chicken is taken out, so it gets a little flavor from the chicken as well since we aren’t cooking the chicken in the gravy.

This is a lovely recipe for a weekend Brunch or to display your cooking skills to those uninvited guests, when you don’t want to spend too much time in the kitchen. It’s a pretty quick fix to traditional Biryani and modern-day Chicken over Rice. One of my self invented and the best recipes ever…Enjoy!!!

Tughlaqi Chicken Kebab

Tughlaq Dynasty was a Muslim dynasty of Turkish-Indian origin which ruled over the Delhi sultanate in medieval India. Its reign started in 1320 in Delhi when Ghazi Malik assumed the throne under the title of Ghiyath al-Din Tughluq. Though Tughlaqs weren’t anywhere like Mughals who built numerous monuments in India and mingled and married princesses and came to India with a vision of settling down, but they weren’t too different either. Mohammed bin Tughlaq is the most famous ruler amongst all the rulers of that family and the dynasty expanded its territorial reach during his reign with the help of military campaign. As much as a lot of people while reading Indian history don’t appreciate these Persian or Turkish rulers entering the Indian territories, the fact that we fail to understand is, that it was a norm back then, just like today it is for each nation to compete and show their might by showcasing their missile or nuclear power. I enjoy reading history and love to read about how different kings ruled over their kingdoms, the culture, their traditions and specially their foods.

When the Tughlaq dynasty reigned, the Persians were still getting accustomed to the spice India offered and as much we take spice marinades and cooking like a walk in the park today, since our food palettes know the taste that each spice would give out to a dish, it wasn’t that easy when the blending took place in those old kitchens. Its easier to experiment with flavors now except if you go all out experimenting with something totally new. Getting back to this recipe, the name to this dish comes from someone who loves coming up with awesome names. After the name I started reading history about the Kitchen during the era of Mohammed Bin Tughlaq and discovered though the name came in a fluke but I did discover that this kind of recipes made it to the initial Turkish-Indo recipes. This recipe has a blend of both sides. The hint of Indian spices, the use of Ginger and Garlic which is inspired from Turk-Persian rulers, the idea of marinating chicken before cooking and of course frying them till crunchy. So, with all that I stick to the name and believe the name is apt.

This recipe has a mix of spices with flour and corn starch powder, fried with curry leaves served with my Garlic mayo sauce and some sliced Onions. Its a quick, easy and delicious recipe. Enjoy!!!